Docs / Event Studio
Event Studio
ASAPIO Event Studio is a web-based SAPUI5 application for configuring, deploying, and monitoring ASAPIO integrations — without requiring SAP GUI or ABAP development skills.
Event Studio is available in two editions:
| BTP Edition (incl. AI Assistant) | ABAP Edition |
|---|---|
|
Delivered as an MTAR archive (SAP CAP application). Deployed to SAP BTP Cloud Foundry. Designed for multi-backend landscapes and includes the built-in AI Assistant for guided navigation and contextual documentation help. |
Delivered as an ABAP transport request. Runs directly on your SAP ABAP Server — no SAP BTP required. Ideal for single-backend landscapes where a lean, on-premise deployment is preferred. |
Release compatibility
| Release | ABAP Edition | BTP Edition | CAP Edition |
|---|---|---|---|
| 2510 | 2.0.0 | 2.0.0 | – |
| 2604 | 2.1.0 | 2.1.0 | – |
| 2607 | 2.2.0 | 2.2.0 | 2.2.0 |
| 2610 | 2.3.0 | 2.3.0 | 2.3.0 |
Release numbers follow the pattern YYMM, e.g. 2607 = July 2026. – = not available in this release.
Both editions share the same core feature set.
The sections below cover deployment instructions for each edition, followed by the application documentation applicable to both.Application Sections
| Page | Functionality |
|---|---|
| Data Catalog | Browse available data objects, navigate to details, deploy standard events or update existing deployments, retrieve AsyncAPI schemas |
| Interfaces | View existing interfaces, create new interfaces, transport interface configurations, access AsyncAPI schemas |
| Events | Browse predefined events; add, update, or delete individual entries |
| Connections | View configured connections; edit via SAP GUI for HTML |
| Explorer | Visualize the entire integration landscape as an interactive network graph |
| Monitoring | Monitor system activity for a selected time range; download request and response traces |
| Help | Current release version, documentation links, and user guidelines |
Deployment
Backend Preparation (both editions)
Regardless of delivery type, the connected on-premise backend system must be configured before deployment.
Verify ASAPIO Integration Add-on Installation
At least version 9.32504 (SP11) is required for Event Studio. See the download page for details.
Verify Package Import
Use transaction SE80 to confirm that the packages /ASADEV/API_CONFIG and /ASADEV/API_EXT (required for the Explorer feature) have been successfully imported.
Activate Required OData Services
Event Studio relies on several OData services that must be active in the system:
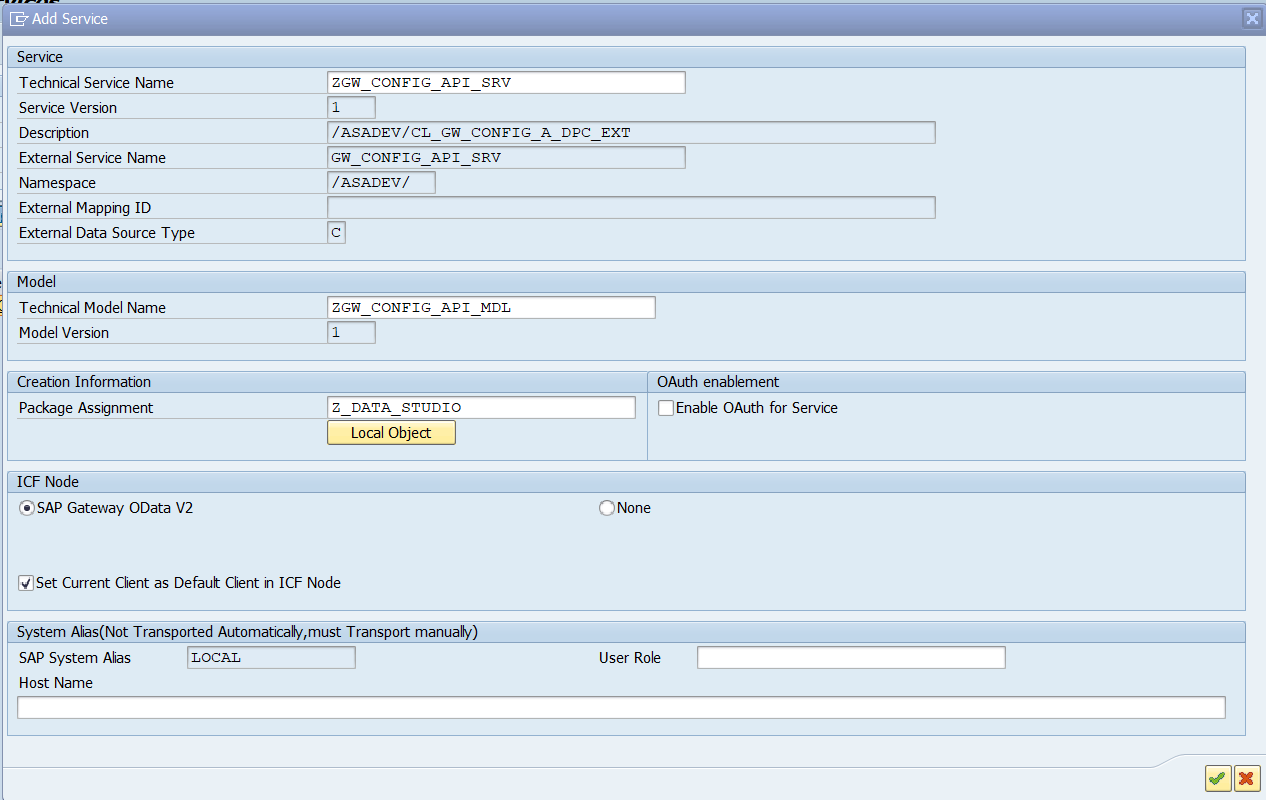
/ASADEV/GW_CONFIG_API_SRV— supports Event Studio's main functions/ASADEV/ODATA_EXTINT_1_SRV— required for the Explorer featureAPS_EXT_CCV_SRV— required for CDS Payloads creation
For each service, open transaction /n/IWFND/MAINT_SERVICE, click Add Service, and fill in:
- System Alias: LOCAL (or your system alias)
- Technical Service Name: e.g.
/ASADEV/GW_CONFIG_API_SRV
Click Get Services, select the service from the list, click Add Selected Services, and provide the package name and transport request when prompted.
Deploy ABAP Edition (via Transport Request)
Verify Package Import
Use transaction SE80 to confirm the package /ASADEV/APP_UI has been imported successfully.
Activate ICF Nodes
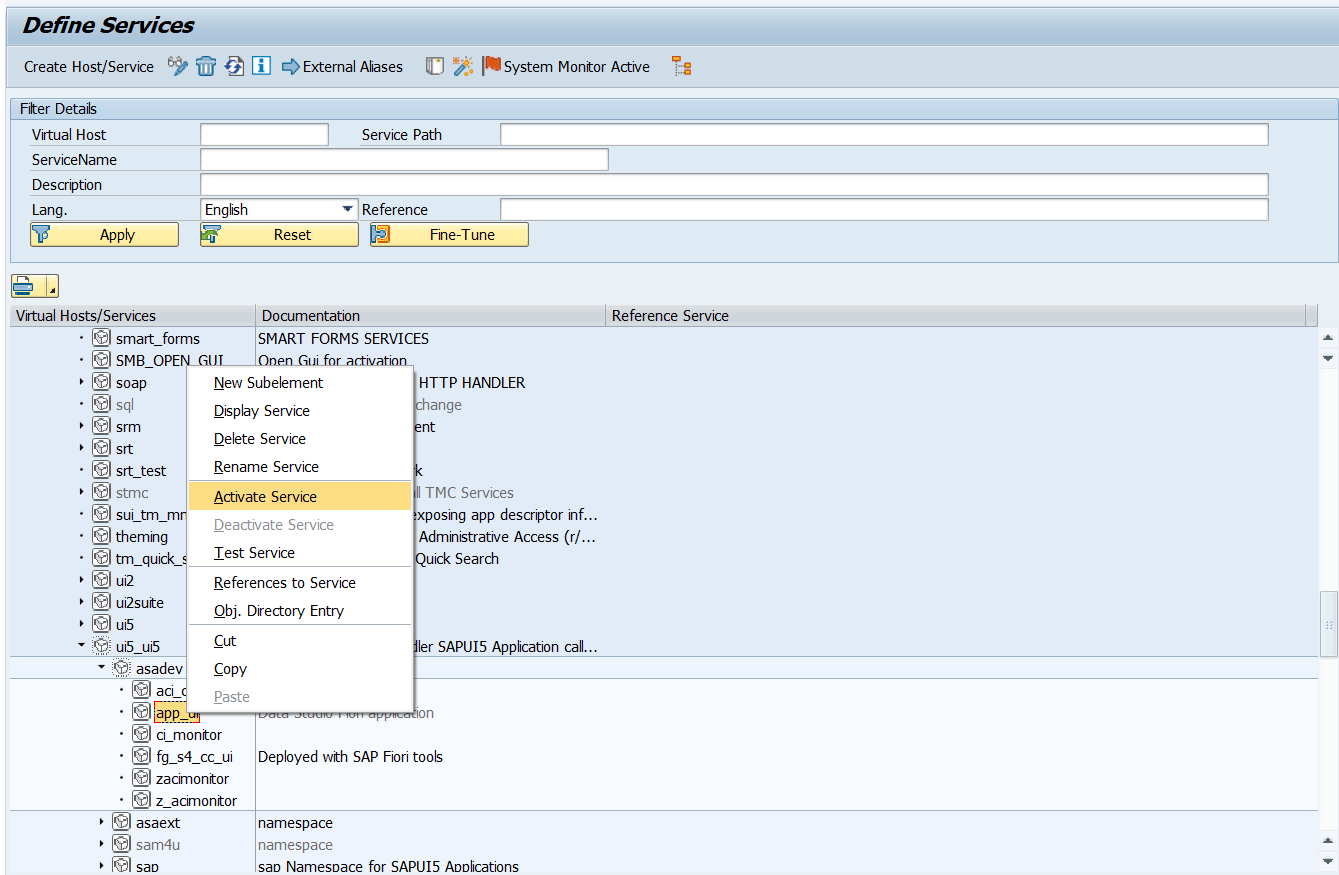
Open transaction SICF and locate the following nodes:
/default_host/sap/bc/bsp/asadev/app_ui/default_host/sap/bc/ui5_ui5/asadev/app_ui
Right-click the app_ui node for each and select Activate Service. Confirm in the popup and ensure activation is performed in the correct client.
Test the Application
In SICF, select the /default_host/sap/bc/ui5_ui5/asadev/app_ui node and choose Test Service. Verify the application loads without errors. Confirm backend connectivity by checking that at least one page (Data Catalog, Interfaces, Events, or Connections) shows data.
Configure as Fiori Launchpad Tile (Optional)
- Open /UI2/FLPD_CUST to access the Fiori Launchpad Designer.
- Create a Semantic Object in /UI2/SEMOBJ (e.g.,
ZEVENTSTUDIO). - In the Launchpad Designer, create a Catalog (e.g., ID
ZCAT_EVENTSTUDIO). - Inside the catalog, create a Target Mapping:
- Semantic Object:
ZEVENTSTUDIO, Action:display - Application Type:
SAPUI5 Fiori App - URL:
/sap/bc/ui5_ui5/sap/zeventstudio
- Semantic Object:
- Create a Tile (App Launcher – Static) using the semantic object and action above.
- Create a Group and assign the tile to it.
- In transaction PFCG, assign the catalog and group to a role, then assign the role to relevant users.
Deploy BTP Edition (via MTAR to SAP BTP)
The delivered package contains a prebuilt Multi-Target Application archive: eventstudiocap-<version>.mtar
Prerequisites
| Tool | Purpose | Check Command |
|---|---|---|
| Cloud Foundry CLI v8+ | Login, target org/space, manage CF applications | cf -v |
| MultiApps CLI plugin | Deploy MTAR/MTA archives | cf plugins |
Install the MultiApps plugin if missing:
cf add-plugin-repo CF-Community https://plugins.cloudfoundry.org
cf install-plugin -f multiapps
Required SAP BTP services:
| Service | Typical Plan |
|---|---|
| Authorization and Trust Management (XSUAA) | application |
| Destination Service | lite |
| Connectivity Service | lite |
Deployment Steps
- Open a terminal and navigate to the folder containing the
.mtarfile. - Log in to Cloud Foundry — obtain an SSO passcode from
https://login.cf.<region>.hana.ondemand.com/passcode, then:cf login -a https://api.cf.eu10-004.hana.ondemand.com -u user@example.com --sso-passcode <SSO_PASSCODE> - Target the correct org and space if not selected during login:
cf target -o <cf-org> -s <cf-space> - Deploy the archive:
cf deploy eventstudiocap-2.2.0.mtar
Post-Deployment: Configure Destinations
In SAP BTP Cockpit, go to Connectivity → Destinations and create a destination for the on-premise backend:
| Property | Value |
|---|---|
| Type | HTTP |
| Proxy Type | OnPremise |
| Authentication | PrincipalPropagation |
| URL | URL of the on-premise SAP system |
| asapio.eventStudioDest (additional) | true |
| HTML5.DynamicDestination (additional) | true |
| asapio.webGuiPath (additional, optional) | URL to SAP Web GUI, e.g. https://s4hana01.local:44300/sap/bc/gui/sap/its/webgui. Provide only if the origin or path of the Web GUI differs from the destination URL. |
| asapio.flpPath (additional, optional) | URL to the SAP Fiori Launchpad, e.g. https://s4hana01.local:44300/sap/bc/ui2/flp?sap-client=100. Provide only if the origin or path of the Launchpad differs from the destination URL. |
The destination name is free — Event Studio identifies the relevant destination by the asapio.eventStudioDest=true additional property. If no such destination exists, users are prompted to select one on the start screen.
Post-Deployment: Configure AI Destination (optional)
Required only if AI features should be enabled. See Bring Your Own LLM below for the destination fields and supported providers.
Post-Deployment: Assign Role Collections
| Role Collection | Purpose |
|---|---|
eventstudiocap_viewer | Required to access Event Studio |
eventstudiocap_aiviewer | Required to access AI features |
After assigning role collections, ask users to log out and back in to refresh their authorization token.
Validation Checklist
After deployment and configuration are complete, open the application URL and validate the following:
| Area | Validation |
|---|---|
| Login | User can log in successfully |
| Authorization | User sees only the features allowed by assigned role collections |
| Backend connection | Remote data loads correctly (Data Catalog, Interfaces, Events pages are populated) |
| AI features | AI side panel is available for users with the AI role |
| AI response | AI agent responds successfully |
General Navigation
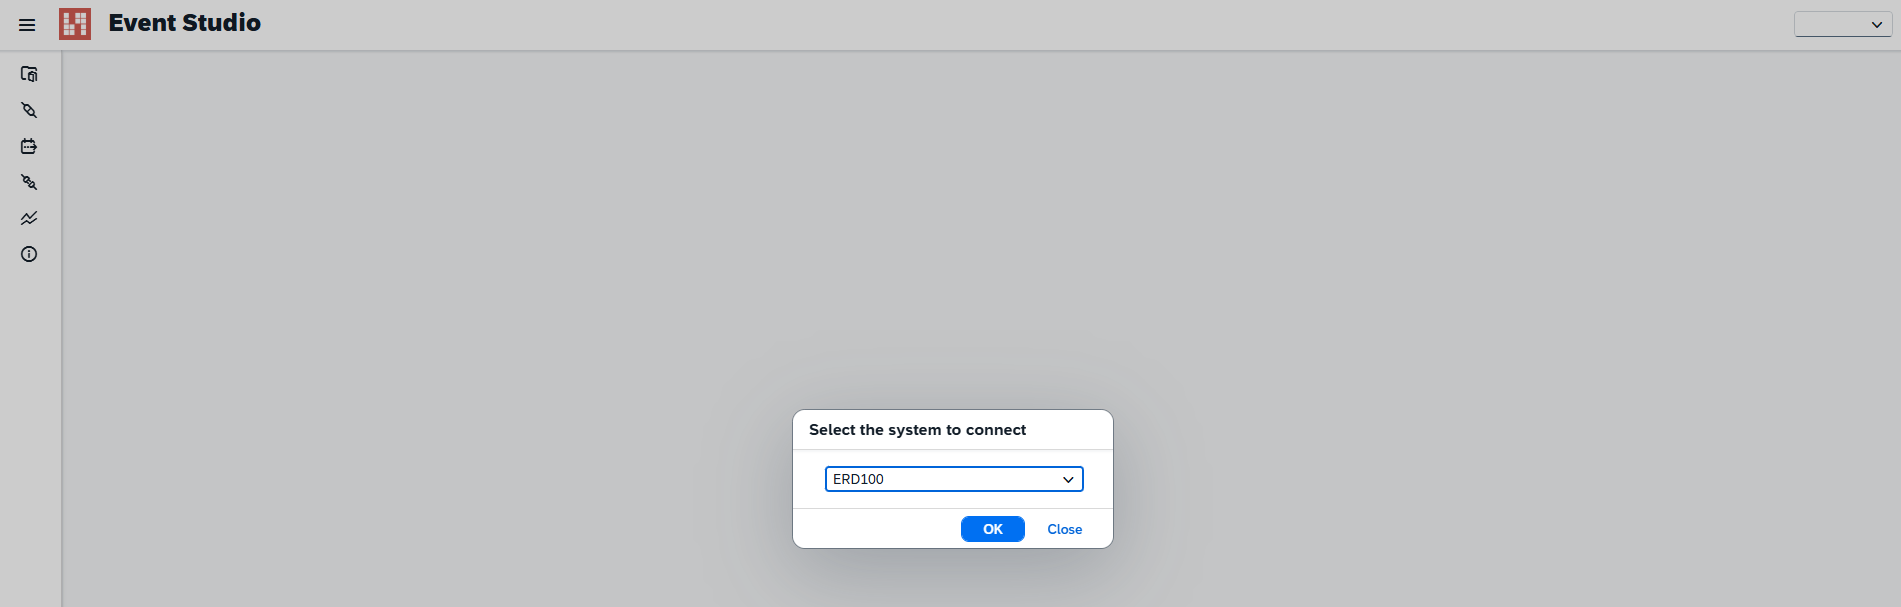
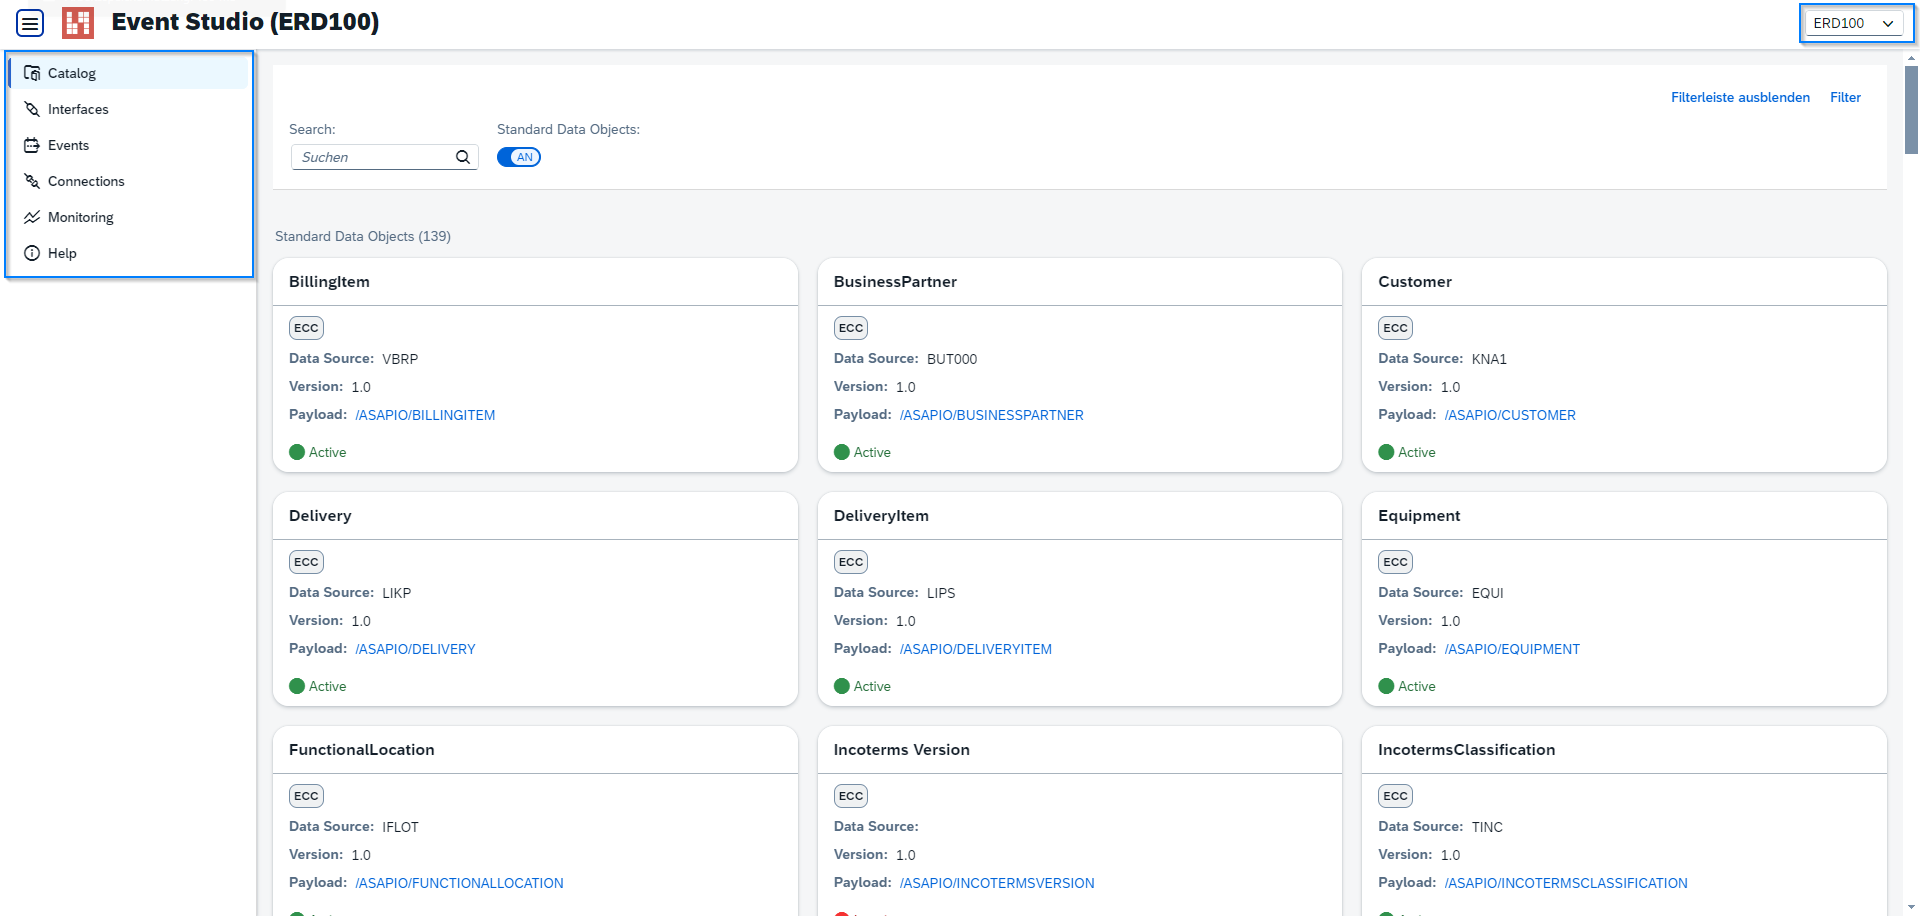
After the application loads, select the desired SAP system from the dropdown and click OK. To switch systems later, use the dropdown in the top-right corner. Use the left sidebar menu to navigate between pages — the default landing page is the Data Catalog.
Data Catalog
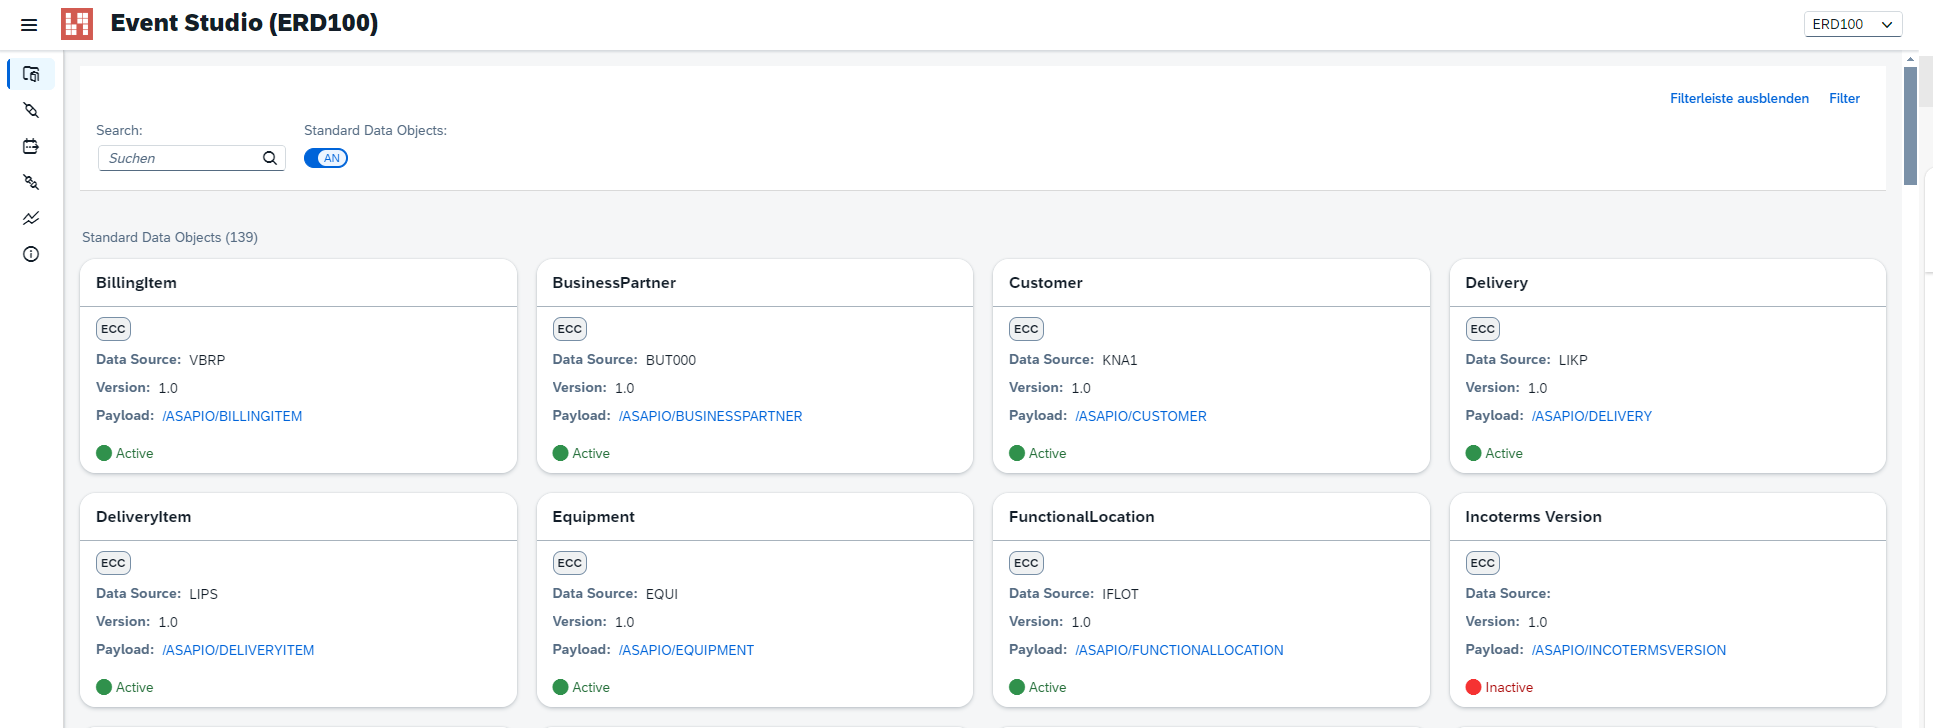
The Data Catalog page lists all available data objects with a filter bar at the top and interactive tiles for each object. The filter bar supports keyword search, Data Layer selection, and Data Objects Type filter (all, standard, or custom).
Each tile shows: title, Data Layer type, payload, package, version, data source name, and status (active/inactive). The Payload link on each tile opens either the Payload Designer in SAP GUI for HTML or the Custom CDS application in the Fiori Launchpad, depending on the source type.
Data Catalog — Details Page
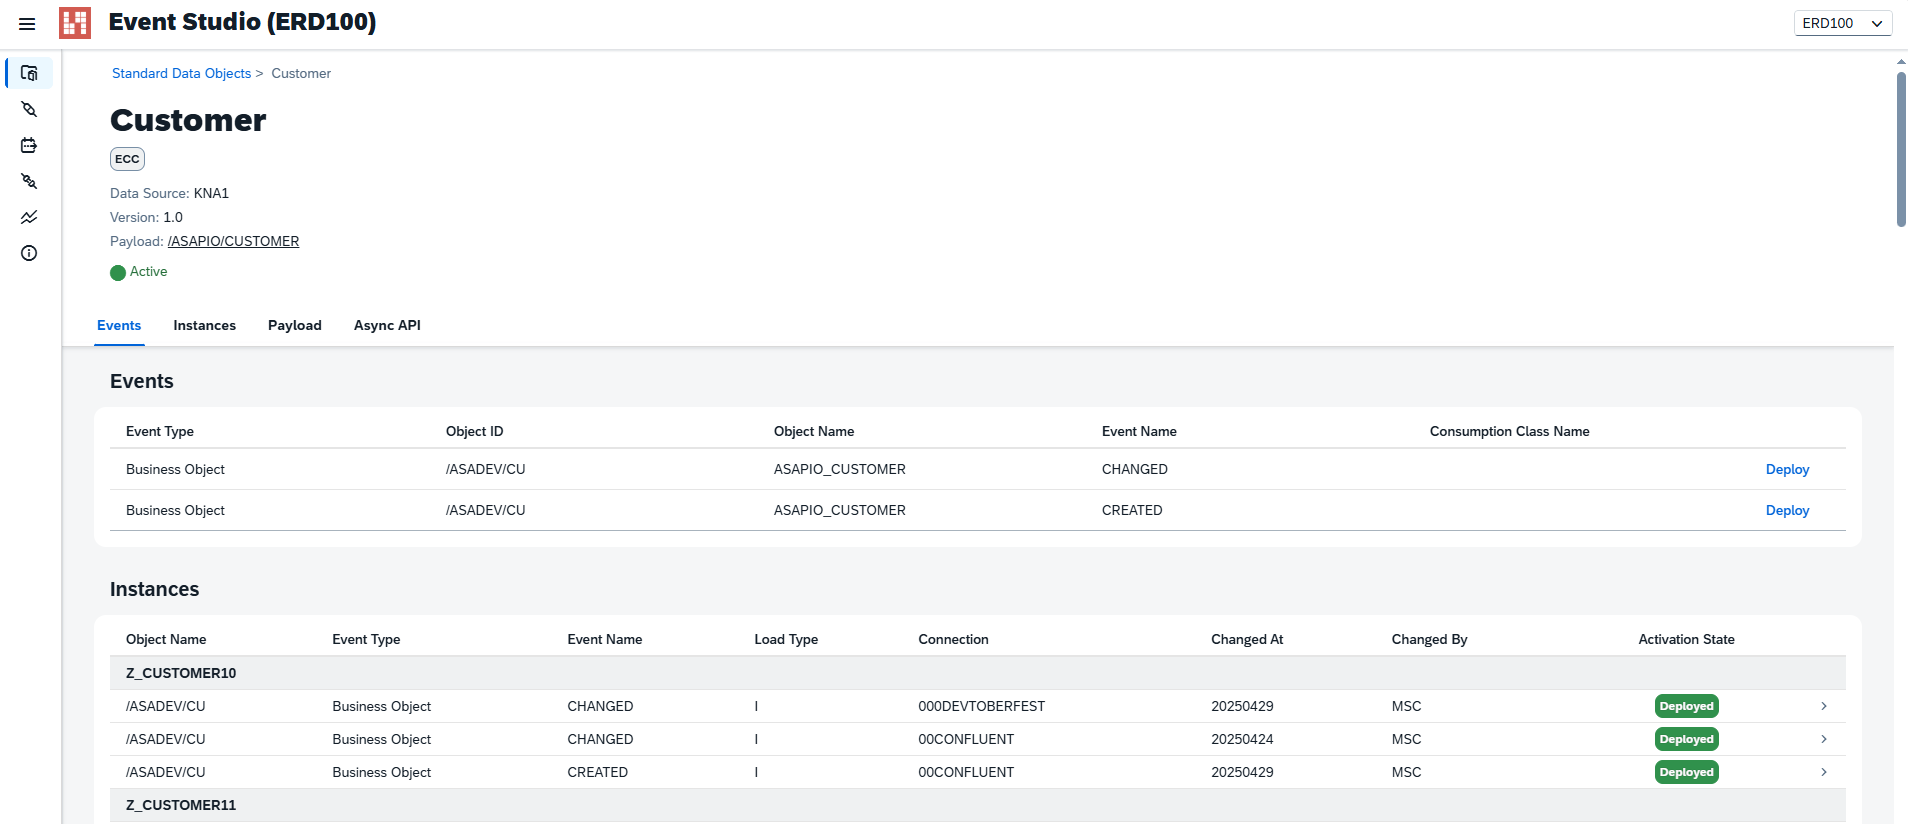
The details page contains:
- Breadcrumb Navigation — navigate back to previously visited pages
- Data Object Header — key attributes summary
- Available Standard Events Table — predefined events with a Deploy button per row and a Create Event button
- Active Instances Table — active deployments with navigation to each instance and update functionality
- Payload Details Table — full payload structure for in-depth review
- AsyncAPI Section — load, copy, or download the AsyncAPI specification for a selected Interface ID
Data Catalog — Deployment Page
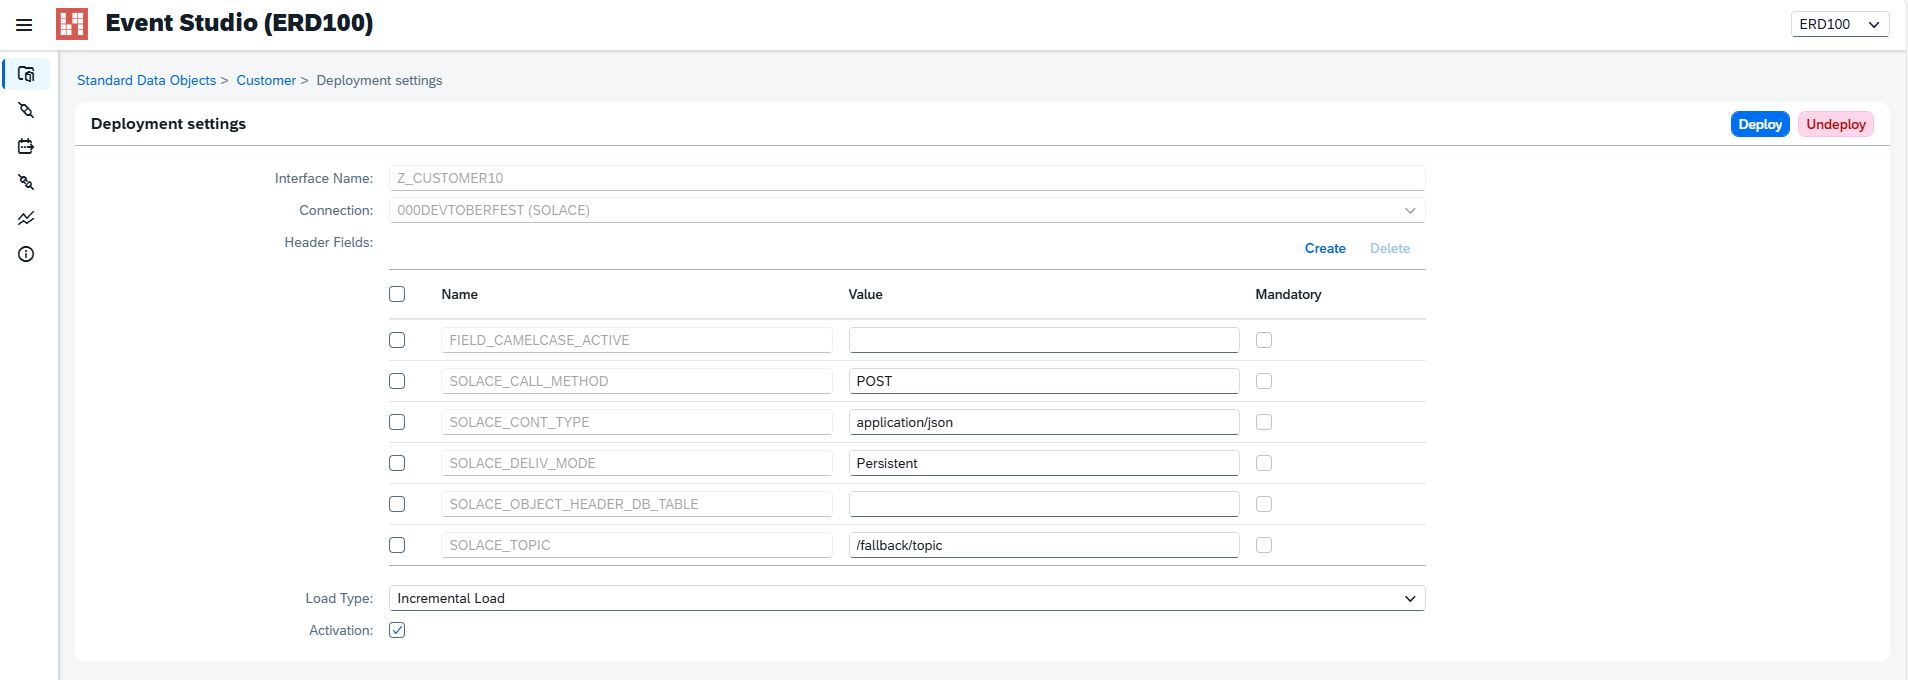
Accessible via the Deploy button in the Events table or by navigating to an entry in the Active Instances table. Configure:
- Interface Name — auto-generated from the data object properties
- Connection — dropdown; selecting one auto-populates the Header Fields table
- Header Fields Table — add, edit, or delete entries; all mandatory fields must be filled
- Load Type — dropdown selection
- Activation Flag — checkbox to activate immediately on deploy
Click Deploy (top right) to create or update the deployment. Invalid or incomplete fields are highlighted; errors show a corresponding message.
Interfaces
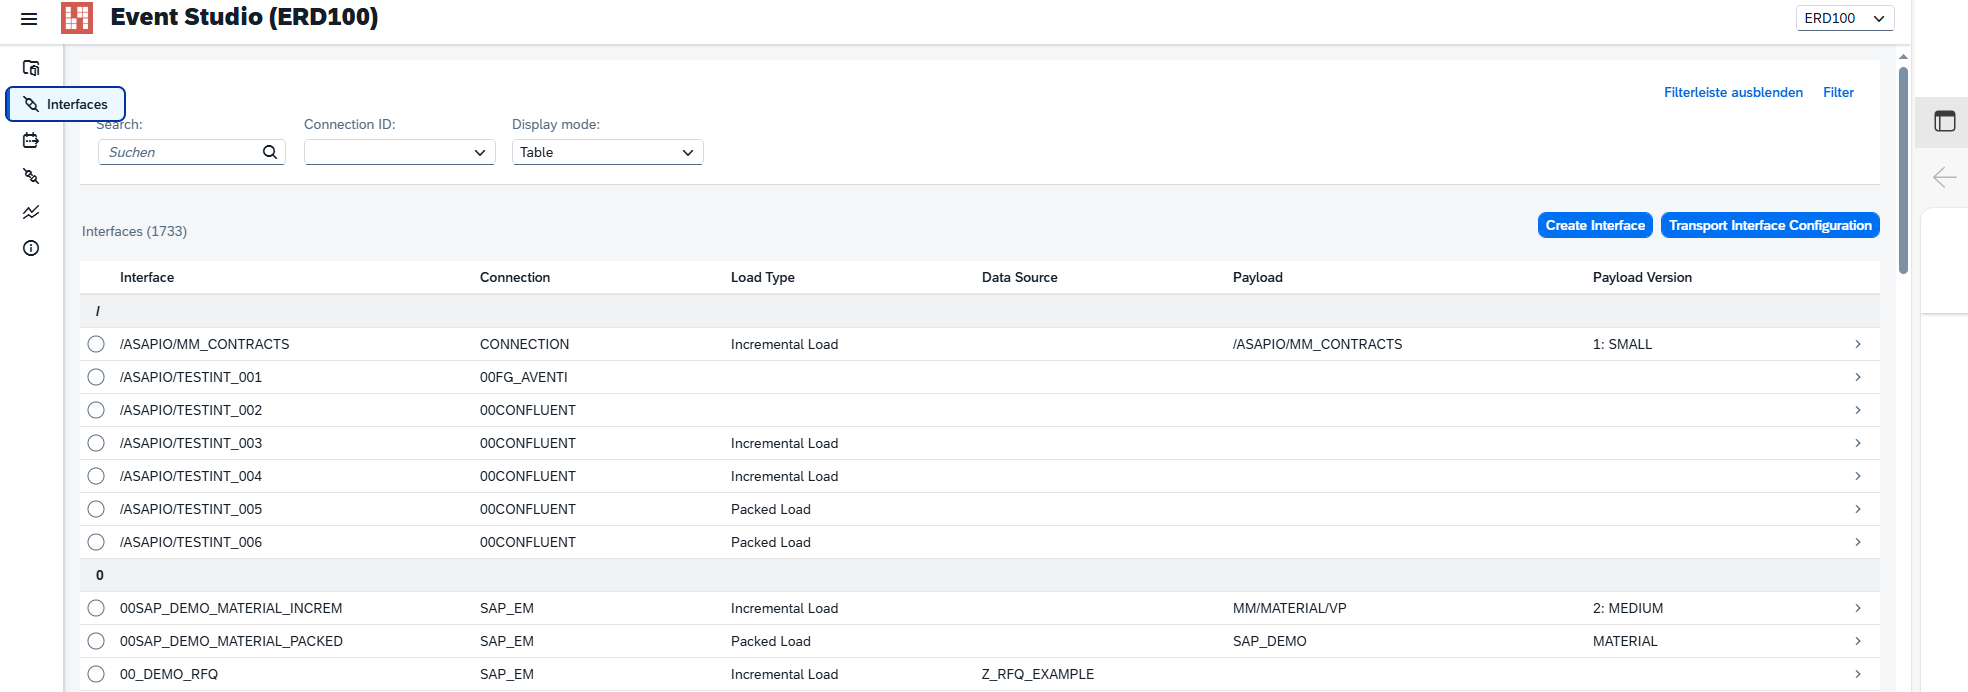
The Interfaces page shows a filter bar and a table (or tile grid) of configured interfaces. Two action buttons sit above the table: Create Interface and Transport Interface Configuration.
The filter bar includes a keyword search field, a Connection ID dropdown, and a Display Mode toggle (table view / grid view).
Create Interface
Click Create Interface to open the creation screen. Fill in:
- Interface Name — free-text input
- Connection — dropdown
- Header Fields Table — auto-populated from Connection and Load Type; entries can be added, modified, or deleted
- Load Type — dropdown
- Extraction Type — dropdown
Click Create (top right) to submit.
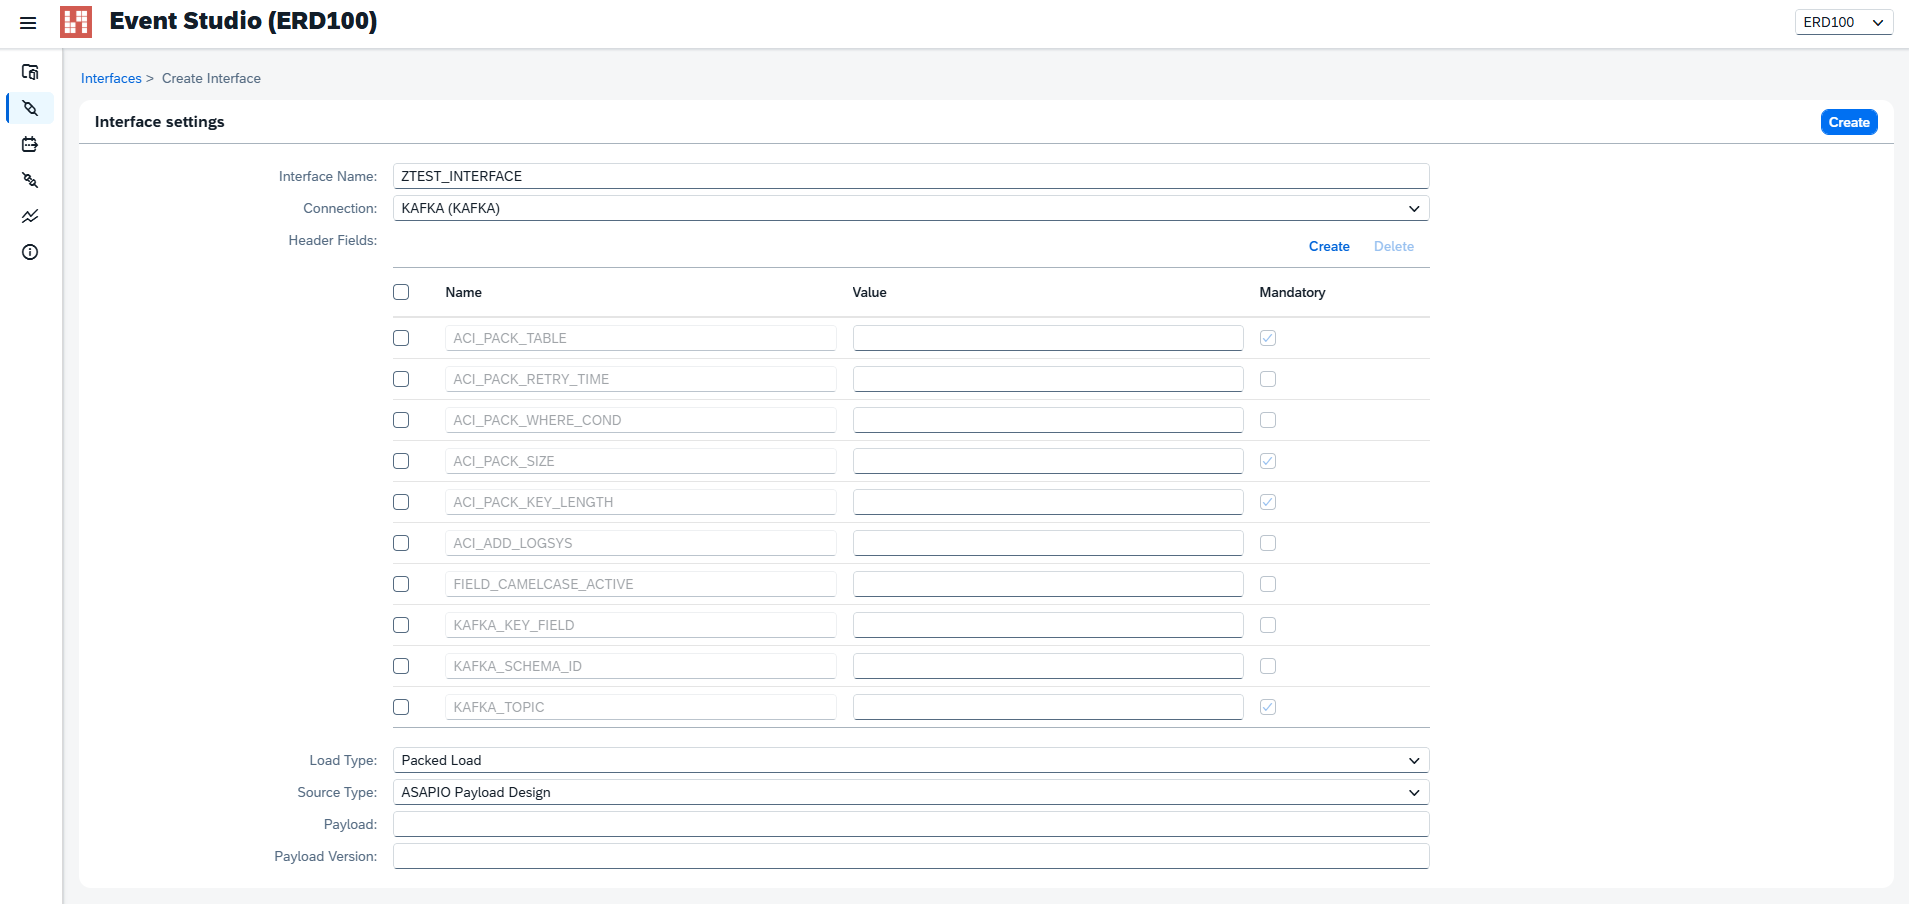
Transport Interface Configuration
Select one or more interfaces in Table View, then click Transport Interface Configuration. A dialog lists available Workbench and Customizing transport requests assigned to the current user. Select the appropriate transports and click OK to add the interface configuration to them.
Note: This action is only available in Table View mode and requires at least one interface to be selected.
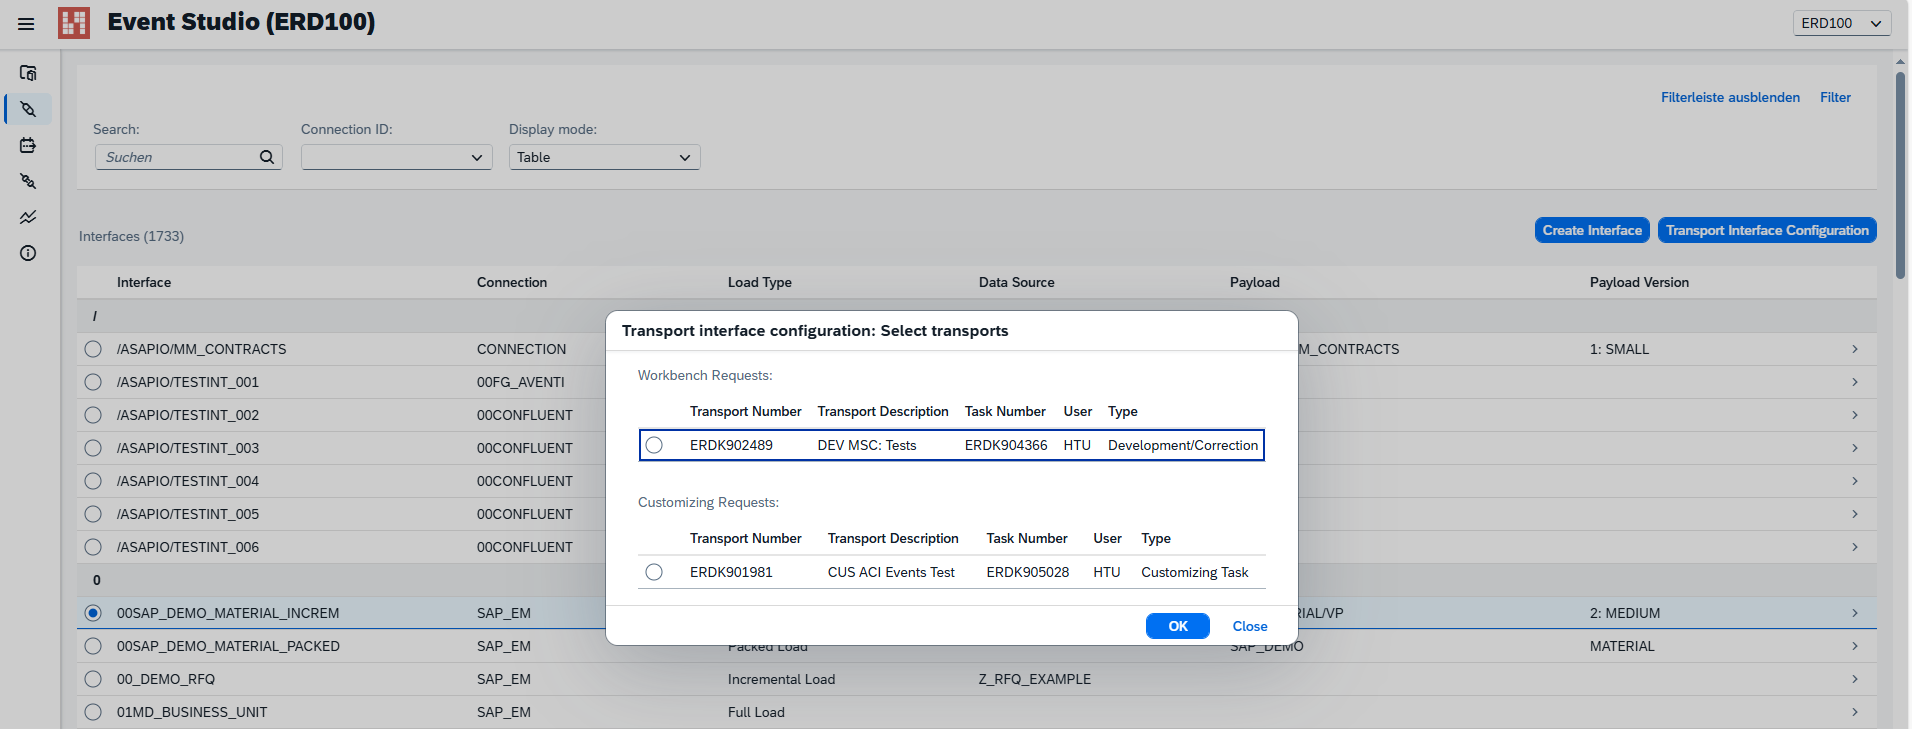
Interface Details
Click any table row or tile to open the details screen, which contains:
- Breadcrumb Navigation
- Interface Tile — key attributes summary
- AsyncAPI Section — load, copy, or download the AsyncAPI schema
- Active Instances Table — navigate to instances and update deployments
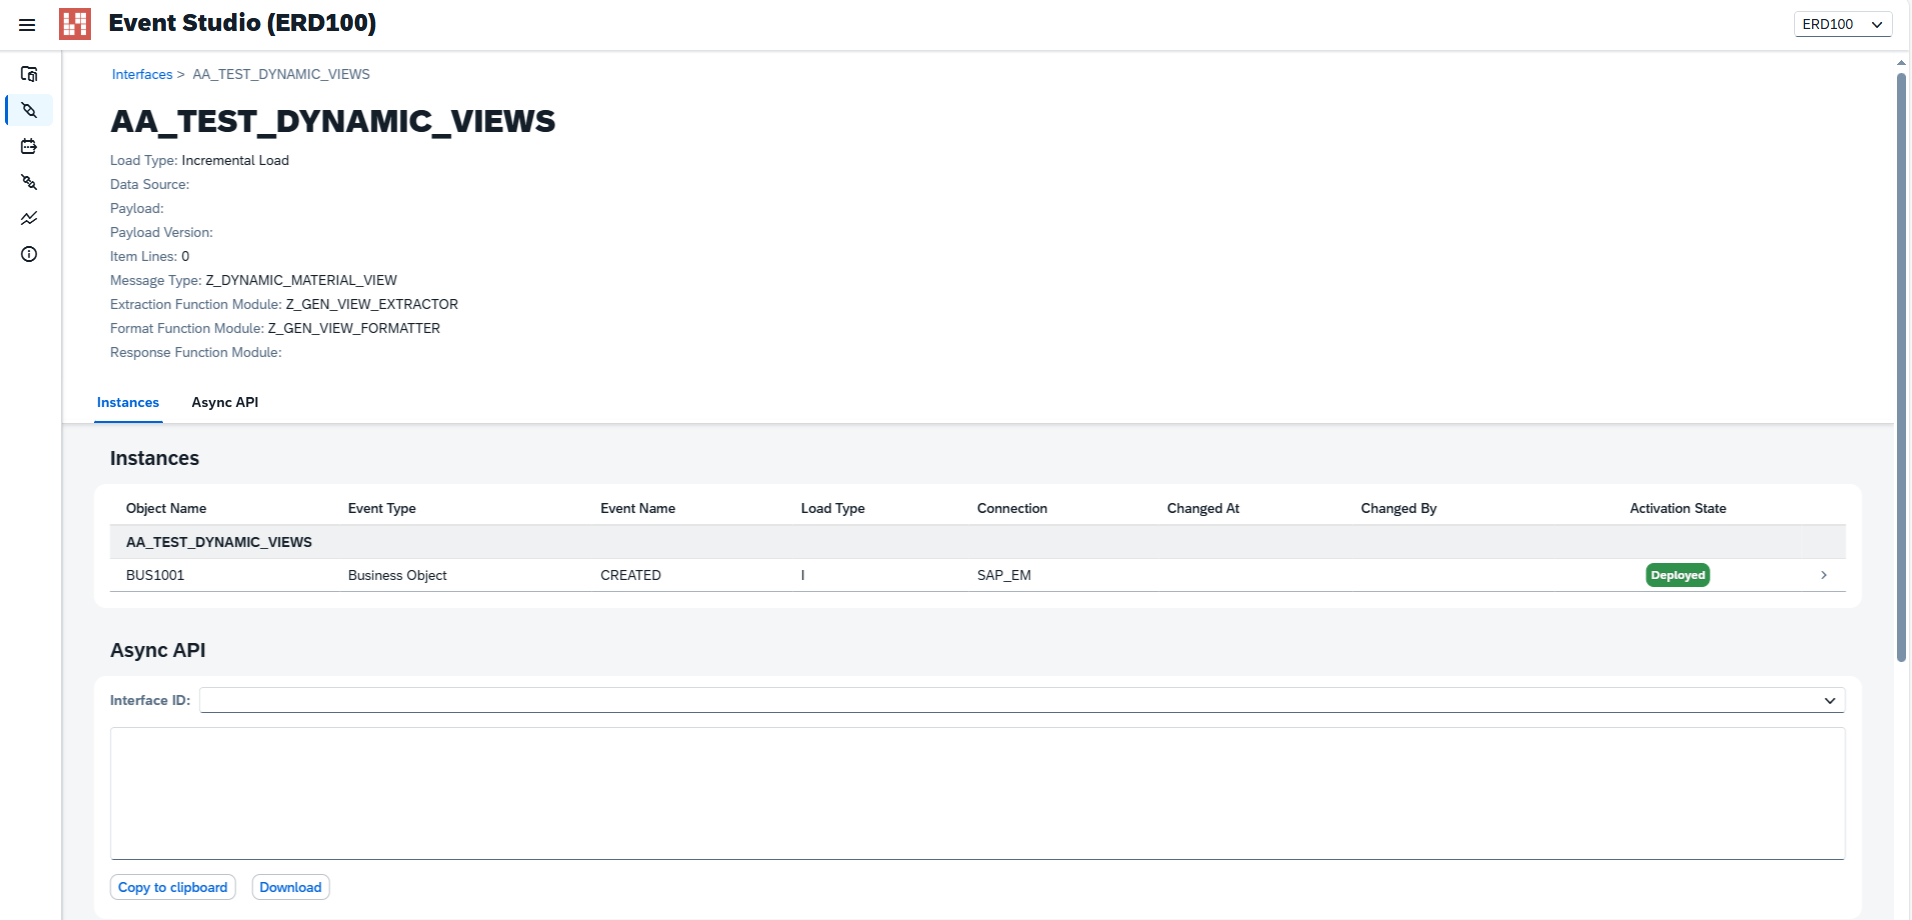
Interface Deployment Page
Accessible from the Active Instances table row. All fields are pre-filled from the selected entry. Adjust as needed and click Deploy to update the existing instance.
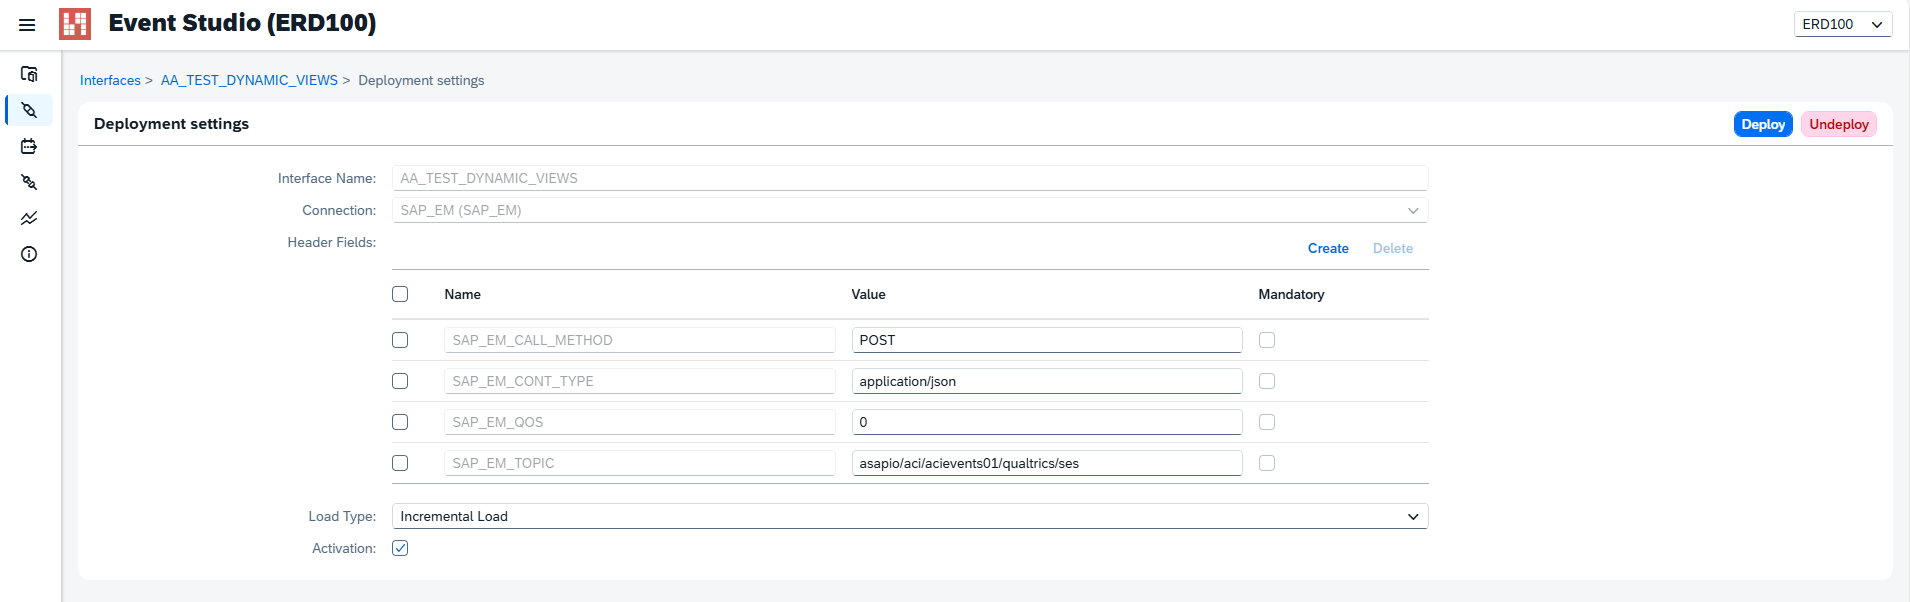
Dynamic Topic (Solace / SAP Advanced Event Mesh)
Dynamic topic is a path of segments that can be defined on the Deployment or Create Interface screen, for example: sap/s4/sales-orders/EMEA/1000/CHANGED
The section only shows when the connection is Solace or SAP Advanced Event Mesh.
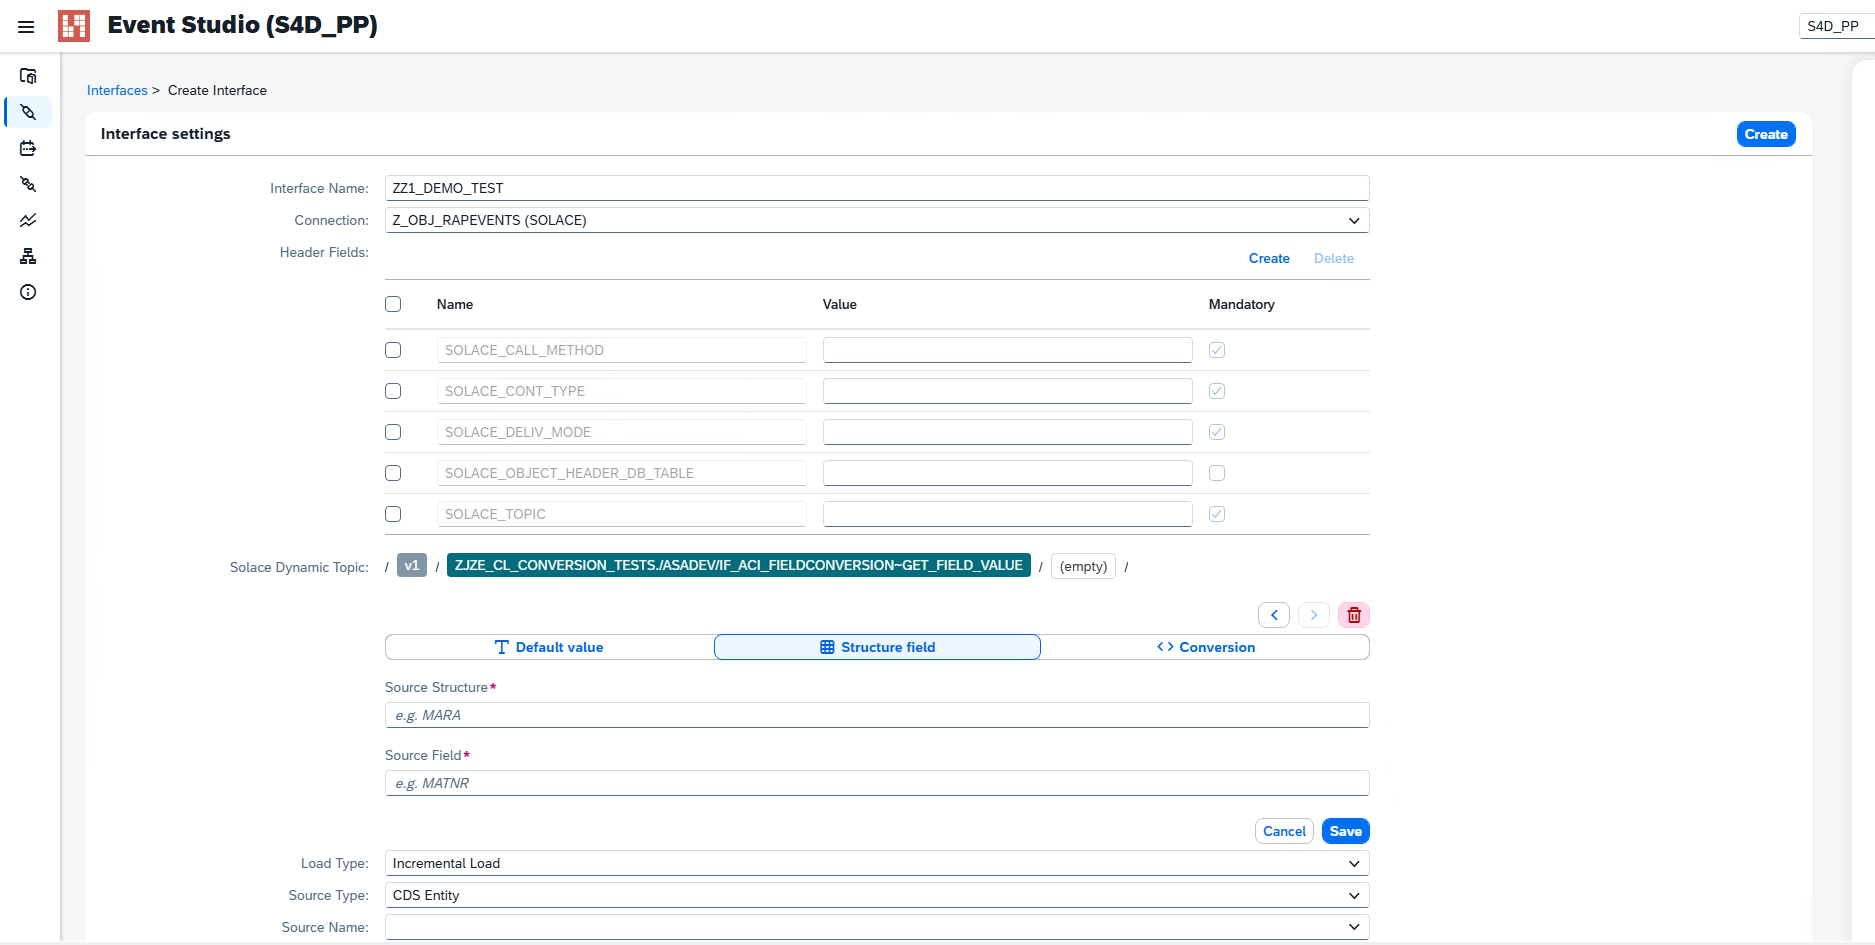
| Segment type | UI Label | Value at runtime |
|---|---|---|
| Fixed | Default value | The same text every time, such as sales-orders |
| From the document | Structure field | A field of the SAP document, such as VBAK.VKORG (sales organisation) |
| Computed | Conversion | The result of an SAP class and method, such as a method that derives a region from a country |
How to set it up
- Choose a connection of type Solace or AEM. The Solace Dynamic Topic section appears.
- Click add. A new segment opens in the editor.
- Pick the segment type with the three-way toggle:
- Default value: type the text.
- Structure field: enter the source structure (for example
MARA) and the field (for exampleMATNR). - Conversion: choose the class and method with the value help. The method list is filtered by the class you chose.
- Click Save. Cancel drops a segment that is still empty, and Save refuses an incomplete one.
- Repeat for each topic level. Each segment shows as a coloured chip, one colour per type, separated by
/. - Click a chip to edit it. The arrow buttons move it left or right, which changes the topic order. The bin button deletes it.
- Click Deploy (or Create) to store the segments.
What happens at runtime
Whenever an event fires, the add-on reads the segments in order. It takes the fixed text, the document field value, or the conversion result, and joins them with / into the topic. For example, one order with VKORG = 1000 and a region method returning EMEA is published to sap/s4/sales-orders/EMEA/1000/CHANGED. A different order can be published to a different topic. Subscribers on Solace or AEM can then subscribe to just the part they care about, for example sap/s4/sales-orders/EMEA/>.
Events
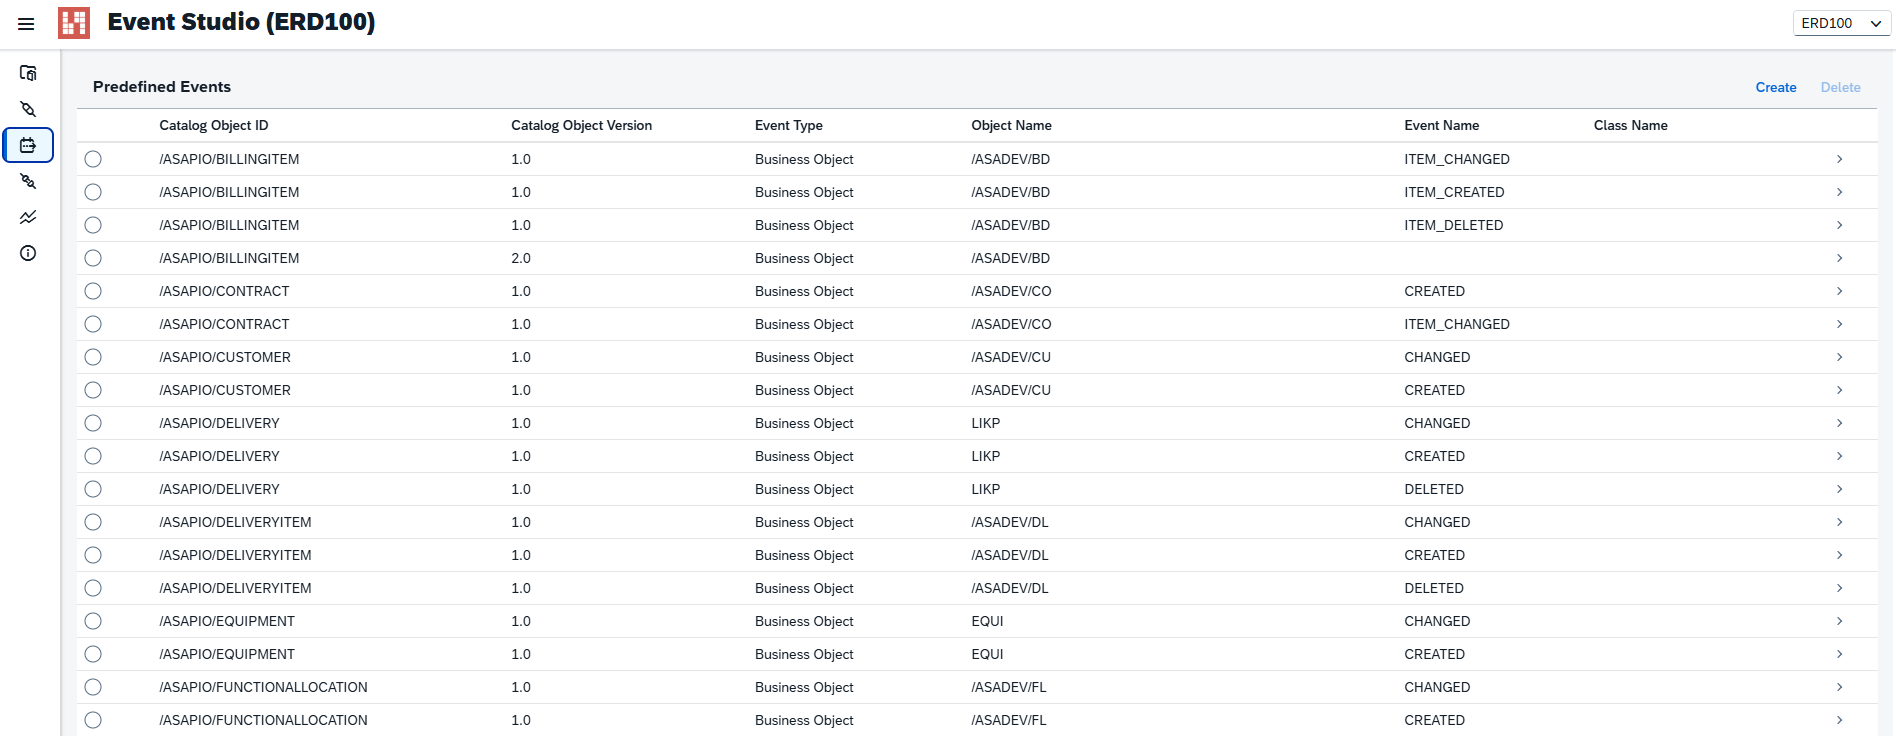
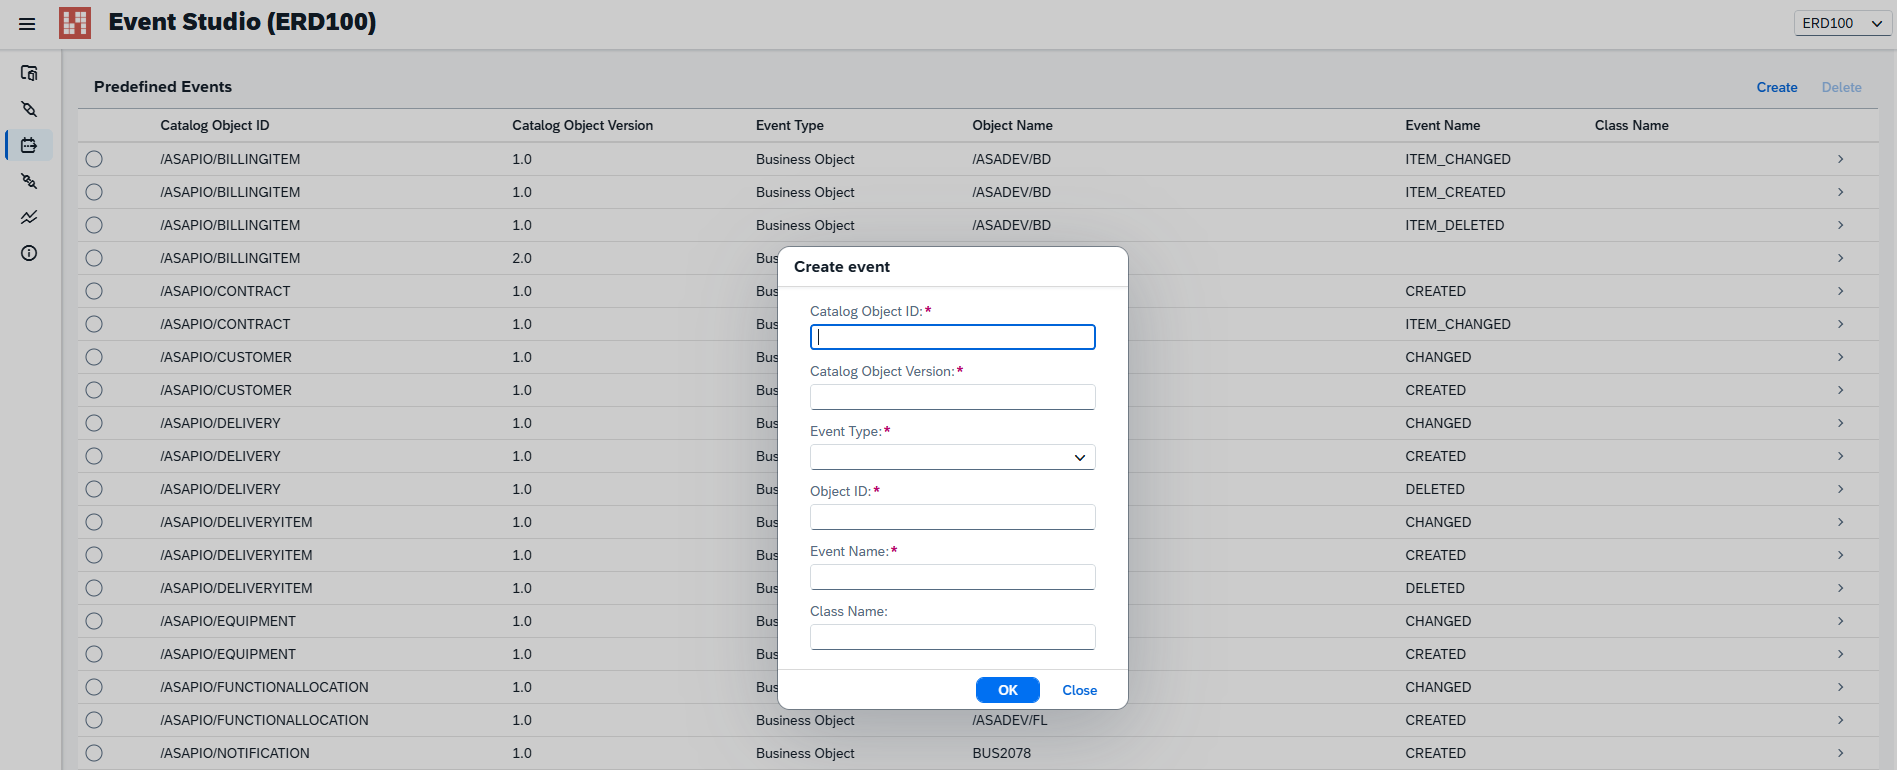
The Events page displays predefined events in a table. Use the Create button to add a new event definition or the Delete button to remove a selected entry. Click any table row to open the details screen, where event information can be viewed or edited.
Some events ship with Event Studio, but you can also add definitions for other events in your system or link standard events to custom data catalog objects.
Connections
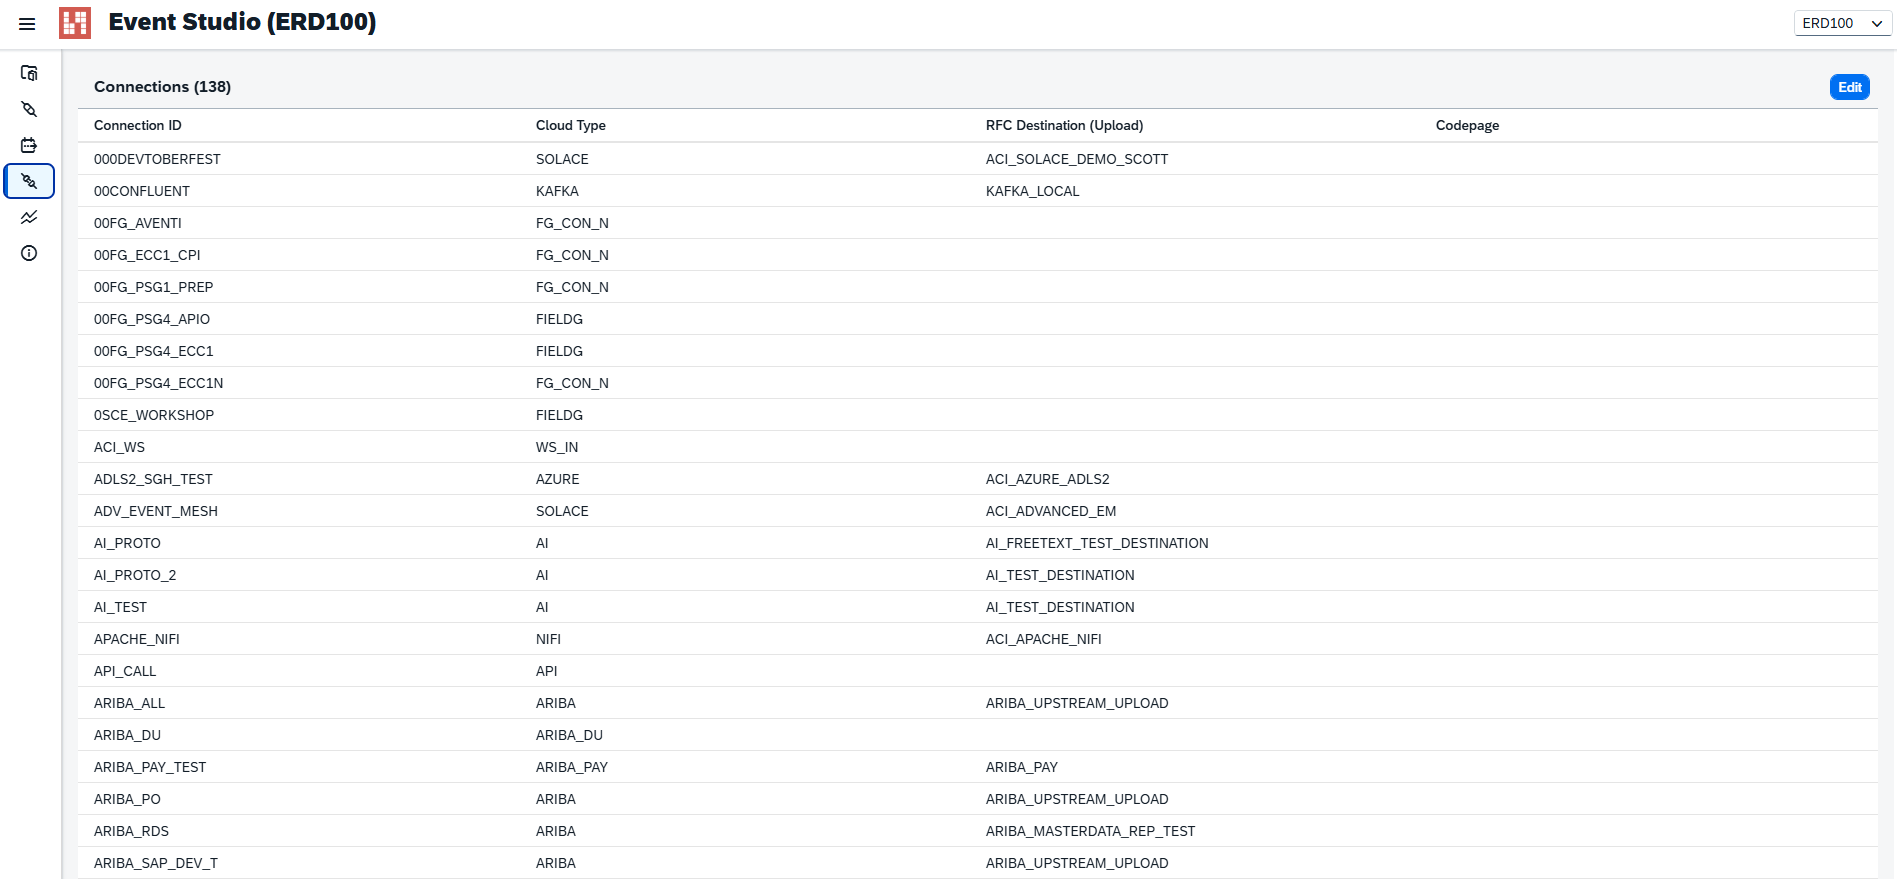
The Connections page displays a table of all configured connections. Use the Edit button to navigate to SAP GUI for HTML, where connection details can be viewed or modified.
Explorer
The Landscape Explorer (currently in beta) is a built-in visualization tool that renders the entire ASAPIO integration landscape as an interactive network graph. The page is split into two areas:
- Integration Network (upper area) — an animated canvas graph. Each node represents a connection endpoint; interfaces are drawn as directed flow chips between the SAP system node and the target connector node. Nodes are color-coded by business category (Business Partner, Sales & Orders, Material/MDM, etc.).
- Lower panel — a tabbed list with three tabs: Interfaces, Connections, and Connectors. Use the Hide panels button to maximize the network view.
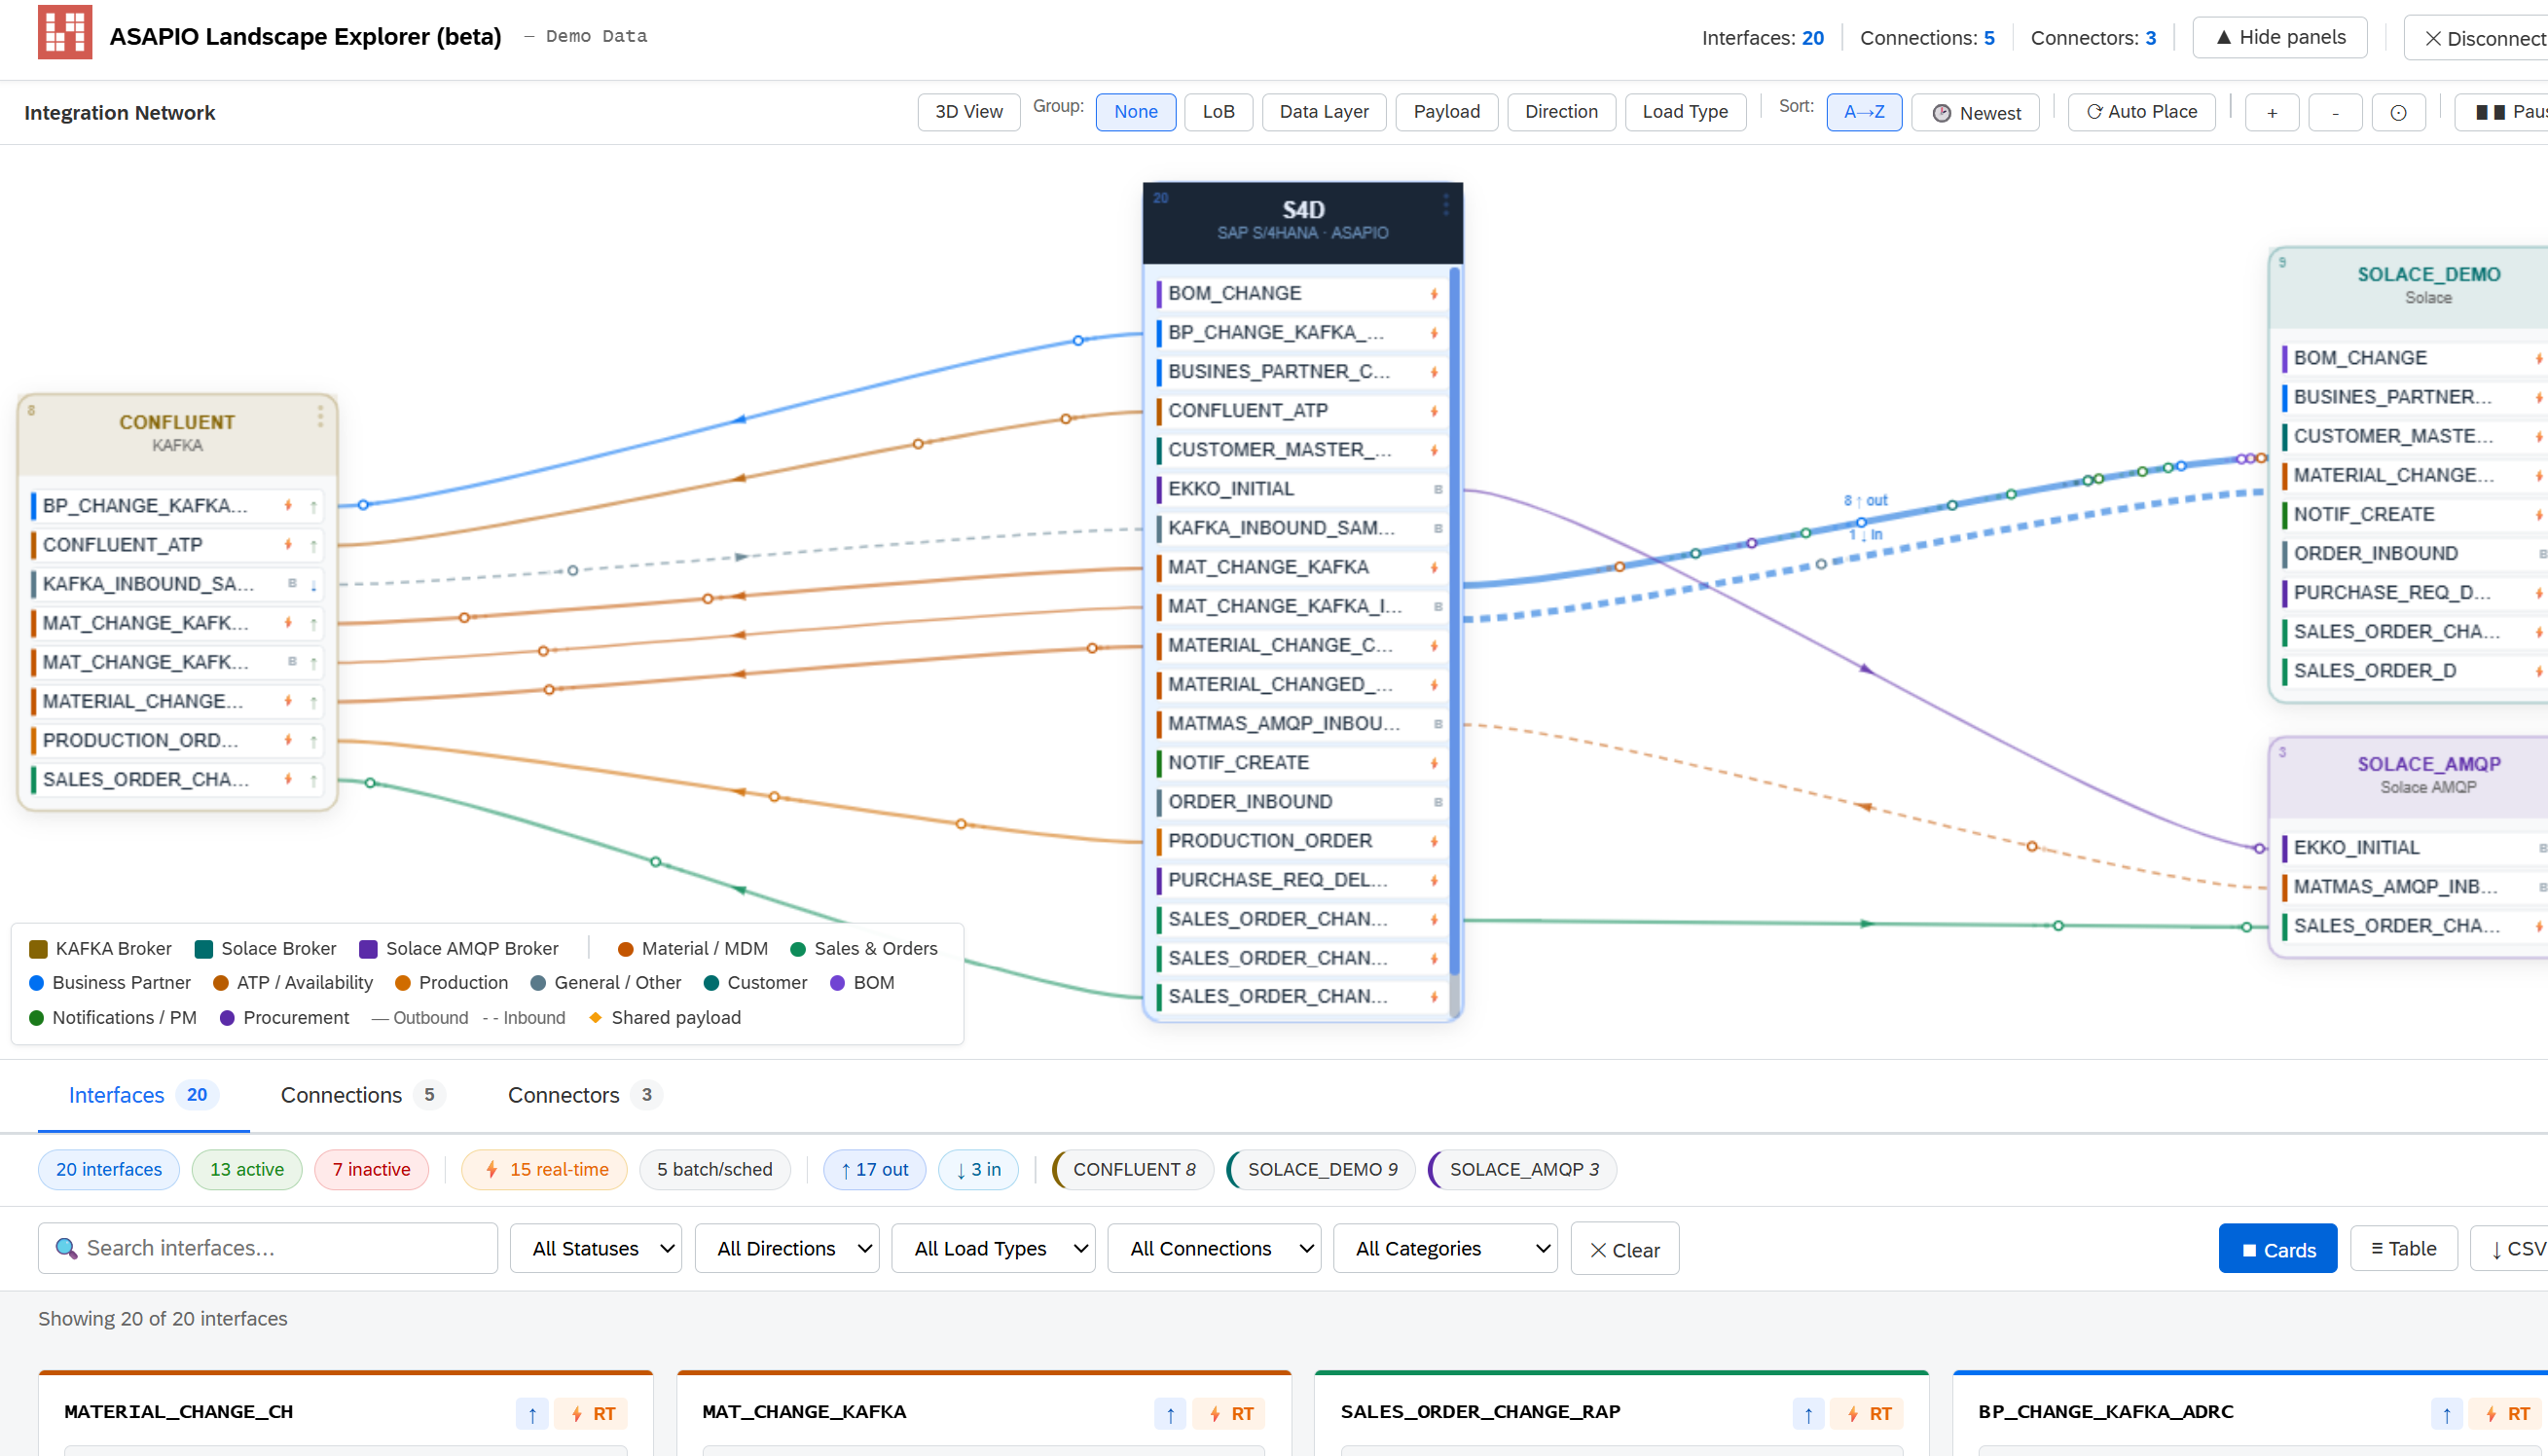
Network Controls
| Control | Description |
|---|---|
| Group | Rearrange nodes by: None, Line of Business (LoB), Data Layer, Payload, Direction, or Load Type |
| Sort | Order interfaces A→Z or newest first |
| Auto Place | Automatically redistribute nodes across the canvas |
| Zoom +/−/⊙ | Zoom in, out, or reset; also supports Ctrl+scroll |
| Pause / Resume | Pause the layout animation |
Clicking a node or interface chip in the network highlights it and cross-selects the corresponding row in the lower panel.
Interfaces Tab
Shows all configured interfaces with a summary bar of clickable filter chips (total, active/inactive, real-time/batch, outbound/inbound, per-connection counts). Chips act as quick filters — click once to apply, again to clear. The toolbar provides full-text search, Status, Direction, Load Type, Connection, and Category filters, a Cards/Table view toggle, and CSV export. Each interface card shows: Interface ID, direction and load-type badges, data-flow arrow, payload name, connection ID, and last-run timestamp.
Detail Panel
Clicking any interface, connection, or connector card opens a slide-in detail panel containing: a Data Flow diagram, an inferred Business Purpose description, Interface Details (all fields), Connection Details, Related Interfaces, a Mini Network Map, and a Copy as JSON button.
Connections and Connectors Tabs
The Connections tab shows a card per configured connector instance (Connection ID, connector type, RFC Destination, SSL, Hostname, Port, and interface count). The Connectors tab shows a card per available connector type (Connector ID, active/inactive status, installed flag, and counts of connections and interfaces).
AI Assistant
BTP Edition only
The BTP Edition of Event Studio includes a built-in AI Assistant sidebar that helps users navigate the application and configure integrations. The assistant can answer questions about interface setup, explain payload structures, and guide users through deployment steps — all in context of the currently open page.
What the Assistant Supports
The assistant is scoped to three kinds of questions:
- Navigation — where a page is and how to get there (e.g. "take me to the catalog", "where can I create a new event?"). It can give a direct in-app link to the page or record.
- Current screen — questions about the data you are actually looking at (e.g. "what events does this interface have?", "which connections are active?", "explain these data objects"). It reads what is on your current page to answer.
- Documentation — how features work and how to configure them.
Documentation Topics It Can Answer
- Getting started & concepts — quick start, key terms/glossary, general FAQ.
- Core features — Payload Designer, message sequencing, inbound and outbound messaging.
- Event formats & sources — CloudEvents, AsyncAPI export, IDoc-to-JSON, RAP events, CDS View / CDS Entity data sources.
- Setup & operations — installation prerequisites and roles, Monitoring, release history, transport, GDPR functions, SAP Cloud ALM connectivity, ATP.
- Supported connectors — AWS, Azure (including Azure Service Bus), Google Pub/Sub, Microsoft Fabric, Apache Kafka, Confluent, Solace, StreamSets, SAP AEM (Advanced Event Mesh), and SAP Event Mesh.
Connectors Excluded from AI Support
The following connectors are not supported by the assistant in this edition, and it will not provide configuration detail for them: SAP Ariba, SAP Fieldglass, mysupply, and AI Vergabemanager. When a question names any of these connectors, the assistant replies with a fixed notice:
"This connector type is not supported currently."
It does not attempt a partial answer or reveal any related documentation for these connectors.
Questions Outside the Assistant's Capabilities
The assistant is not a general-purpose chatbot. It cannot answer questions that have no connection to Event Studio — general ABAP or software development questions, non-ASAPIO SAP transactions or unrelated SAP functionality, or general knowledge and other products. When a question is completely unrelated to Event Studio, the assistant does not guess: it replies with a short message stating the question is outside its area of expertise and lists what it can help with (current-screen, documentation, and navigation) with examples of each. Questions that Event Studio's pages or documentation can partly answer are still answered rather than rejected.
Bring Your Own LLM
The AI Assistant is model-agnostic. LLM provider selection and API key provisioning are managed entirely through SAP BTP Destination Manager — no credentials are stored in the application itself. Currently supported providers: SAP AI Core, Groq, OpenAI, Anthropic (Claude), and Google (Gemini).
Supported Models
Set asapio.modelName to any model identifier below, matched to the provider used in the destination's URL.
claude-sonnet-5) — a good default if you're unsure which provider or model to pick.
| Provider | Base URL (destination URL) | Supported Models |
|---|---|---|
| Groq | https://api.groq.com |
llama-3.1-8b-instant, llama-3.3-70b-versatile, meta-llama/llama-4-scout-17b-16e-instruct, openai/gpt-oss-20b, openai/gpt-oss-120b, qwen/qwen3-32b, groq/compound, whisper-large-v3, whisper-large-v3-turbo, moonshotai/kimi-k2-instruct-0905, meta-llama/llama-prompt-guard-2-22m, meta-llama/llama-prompt-guard-2-86m |
| OpenAI | https://api.openai.com |
gpt-5.5, gpt-5.5-pro, gpt-5.4, gpt-5.4-mini, gpt-5.4-nano, o3, o3-pro, o4-mini, gpt-5.3-codex, gpt-5.2, gpt-5.1 |
| Anthropic (Claude) | https://api.anthropic.com |
claude-sonnet-5, claude-fable-5, claude-opus-4.8, claude-opus-4.7, claude-sonnet-4.6, claude-opus-4.6, claude-sonnet-4.5, claude-haiku-4.5, claude-opus-4.5, claude-mythos-5, claude-mythos-preview |
| Google (Gemini) | https://generativelanguage.googleapis.com |
gemini-3.5-flash, gemini-3.1-pro-preview, gemini-3.1-flash-lite, gemini-3-pro-image, gemini-3.1-flash-image, gemini-3.1-flash-lite-image, gemini-live-2.5-flash-native-audio, gemini-3-flash-preview, gemini-2.5-pro, gemini-2.5-flash, gemini-2.5-flash-lite, gemini-2.5-flash-live, gemini-2.5-pro-tts, gemini-2.5-flash-tts |
To configure the AI backend, create a destination in SAP BTP Cockpit (Connectivity → Destinations) with the following properties:
| Property | Value |
|---|---|
| Type | HTTP |
| Proxy Type | Internet |
| Authentication | NoAuthentication |
| URL | Provider base URL from the Supported Models table above, e.g. https://api.anthropic.com |
Then add the following additional properties:
| Additional Property | Value |
|---|---|
asapio.aiDest | true — marks this destination as the AI provider |
asapio.modelName | Model identifier from the Supported Models table above, e.g. claude-sonnet-5 |
URL.headers.Authorization | bearer <your_api_key> |
asapio.useLangchain | true |
asapio.tokenDayLimit | Daily token limit for all users, e.g. 60000 |
Users with the eventstudiocap_aiviewer role collection can access the AI sidebar. See Deploy BTP Edition above.
AI Core Setup
-
Book entitlement (Global Account)
- BTP Cockpit → Global Account → Entitlements
- Add the "SAP AI Core" service
- Plan: extended (only this plan allows the use of foundation models such as Claude)
- Assign quota to the target subaccount
-
Create Service Instance & Service Key (Subaccount)
- Instances and Subscriptions → Create → Service: SAP AI Core, Plan: extended
- Create the instance (name of your choice)
- Create a Service Key: Instance → Actions (…) → Create Service Key
The Service Key provides the values needed for all following steps:
- clientid → Client ID for OAuth2ClientCredentials
- clientsecret → Client Secret for OAuth2ClientCredentials
- url → Token Service URL (append /oauth/token)
- serviceurls.AI_API_URL → AI_API_URL (inference endpoint / Destination URL)
-
Obtain an OAuth Token (manual verification only)
This step is only needed to manually verify the setup via PowerShell/curl before wiring it into the app. The app itself never fetches this token manually (see Step 9).
$authUrl='<AUTH_URL>/oauth/token'
$clientId='<clientid>'
$clientSecret='<clientsecret>' # single quotes!
$aiApiUrl='<AI_API_URL>'
$tokenResponse = Invoke-RestMethod -Uri $authUrl -Method Post -ContentType 'application/x-www-form-urlencoded' -Body @{grant_type='client_credentials';client_id=$clientId;client_secret=$clientSecret} $accessToken = $tokenResponse.access_token -
Check the Model Catalog
$models = Invoke-RestMethod -Uri "$aiApiUrl/v2/lm/scenarios/foundation-models/models" ` -Method Get -Headers @{Authorization="Bearer $accessToken";"AI-ResourceGroup"="default"}$models.resources | Where-Object { $_.model -like 'anthropic--*' } | Select-Object model, executableId -
Create the Configuration
$configBody = @{ name = 'Claude_Haiku_4_5' executableId = 'aws-bedrock' scenarioId = 'foundation-models' parameterBindings = @( @{key='modelName'; value='anthropic--claude-4.5-haiku'}, @{key='modelVersion'; value='1'} ) } | ConvertTo-Json$configResponse = Invoke-RestMethod -Uri "$aiApiUrl/v2/lm/configurations" -Method Post -Headers @{Authorization="Bearer $accessToken";"AI-ResourceGroup"="default";"Content-Type"="application/json"} -Body $configBodyThe response returns an id. This is the Configuration ID needed in the next step.
-
Create the Deployment
$deployBody = @{ configurationId = '<CONFIGURATION_ID_FROM_STEP_5>' } | ConvertTo-Json$deployResponse = Invoke-RestMethod -Uri "$aiApiUrl/v2/lm/deployments" -Method Post -Headers @{Authorization="Bearer $accessToken";"AI-ResourceGroup"="default";"Content-Type"="application/json"} -Body $deployBodyReturns the Deployment ID, status initially UNKNOWN/PENDING, reaches RUNNING after ~3-5 minutes.
Note down this Deployment ID – you'll need it for Step 7a and later for the
asapio.aiCoreDeploymentIdAdditional Property on the Destination (Step 9.1). -
Check the Deployment Status
$statusResponse = Invoke-RestMethod -Uri "$aiApiUrl/v2/lm/deployments/<DEPLOYMENT_ID>" -Method Get ` -Headers @{Authorization="Bearer $accessToken";"AI-Resource-Group"="default"} $statusResponse.status7.1 Determine Which Model Is Actually Running Behind a Deployment
Use this when you already have a Deployment ID (e.g. taken from an existing Destination's
asapio.aiCoreDeploymentId) and need to confirm which model is actually deployed behind it – for example before filling inasapio.modelNameon a Destination, or when auditing an unfamiliar deployment.Prerequisite: AUTH_URL, clientid, clientsecret, AI_API_URL from the AI Core Service Key (Step 2).
$authUrl='<AUTH_URL>/oauth/token' $clientId='<clientid>' $clientSecret='<clientsecret>' # single quotes, in case the secret contains a $ $aiApiUrl='<AI_API_URL>'- Get OAuth token
$tokenResponse = Invoke-RestMethod -Uri $authUrl -Method Post -ContentType 'application/x-www-form-urlencoded' -Body @{grant_type='client_credentials';client_id=$clientId;client_secret=$clientSecret} $accessToken = $tokenResponse.access_token - Query the deployment
$deployment = Invoke-RestMethod -Uri "$aiApiUrl/v2/lm/deployments/<DEPLOYMENT_ID>" -Method Get ` -Headers @{Authorization="Bearer $accessToken";"AI-Resource-Group"="default"} $deployment.status - Query the Configuration to see the model name that is actually deployed
$config = Invoke-RestMethod -Uri "$aiApiUrl/v2/lm/configurations/$($deployment.configurationId)" -Method Get `
  -Headers @{Authorization="Bearer $accessToken";"AI-Resource-Group"="default"}
$config.parameterBindings
Result: $config.parameterBindings lists the deployed modelName (e.g. anthropic--claude-4.5-sonnet) and modelVersion. Enter this value in the
asapio.modelNameAdditional Property on the corresponding AI Core Destination (see Step 9.1), that's the only place it needs to be set. - Get OAuth token
-
Call Claude (manual verification only)
$invokeBody = @{
  anthropic_version = 'bedrock-2023-05-31'
  max_tokens = 100
  temperature = 0.2
  messages = @(@{role='user'; content='Your message here'})
} | ConvertTo-Json -Depth 5
$invokeResponse = Invoke-RestMethod -Uri "$aiApiUrl/v2/inference/deployments/<DEPLOYMENT_ID>/invoke" -Method Post -Headers @{Authorization="Bearer $accessToken";"AI-ResourceGroup"="default";"Content-Type"="application/json"} -Body $invokeBody -
Integration into the App (eventstudiocap – Destination-based)
Adding, changing, or removing an AI Core or Langchain AI model like Claude requires only a Destination edit.
9.1 Create the Destination
Destination Details:
Field Value Name e.g. AICoreDestination Type HTTP URL <AI_API_URL> (from step 2) Proxy Type Internet Authentication OAuth2ClientCredentials Token Service URL <AUTH_URL> (/oauth/token from step 2) Client ID <clientid> (from step 2) Client Secret <clientsecret> (from Step 2) Additional Properties:
Key Value Purpose asapio.aiDesttrueFlags this destination as an AI model, makes it appear in the chat model dropdown asapio.provideraicoreRoutes this destination through the AI Core invocation path instead of a direct-fetch provider asapio.modelNamee.g. claude-sonnet-aicoreDisplay name shown in the model dropdown (Destination → modelName). Determine the underlying deployed model with Step 7a before setting this. asapio.aiCoreDeploymentIdString deployment id ID of the AI Core deployment created in step 6. asapio.aiCoreBackendanthropic-bedrockOnly these values are valid: anthropic-bedrock (Claude), openai (OpenAI models), gemini (Gemini models) – depending on the deployed model. asapio.aiCoreResourceGroupdefaultSent as the AI-Resource-Group header on every /invoke call asapio.tokenDayLimite.g. 60000App-internal daily token budget for this destination. Default value is always 60000 unless changed. -
Check Function of AI Sidebar
Check if the AI Sidebar is working.
-
Error Messages
asapio.aiCoreResourceGroupproperty is not set:
Error: AI destination 'AICoreDestination' is missing the asapio.aiCoreResourceGroup property. Please contact your BTP administrator to configure it.asapio.aiCoreDeploymentIdproperty is not set:
Error: AI destination 'AICoreDestination' is missing the asapio.aiCoreDeploymentId property. Please contact your BTP administrator to configure it.asapio.modelNameproperty is not set:
Error: AI destination 'AICoreDestination' is missing the asapio.modelName property. Please contact your BTP administrator to configure it.
Event Studio MCP Server
The ASAPIO Event Studio MCP server exposes Event Studio's core functionality — SAP outbound event/interface configuration, CDS view generation, and deployment — as tools an MCP-compatible AI client (Claude Desktop, Claude Code) can call directly. Instead of clicking through the Event Studio UI, a developer can describe what they want in natural language and have Claude create, inspect, filter, or deploy the underlying objects on their behalf.
| Tool name | Capability |
|---|---|
data_catalog_list | List Data Catalog entries; filter by Type, DataLayer, IsActive, or free-text search. |
data_catalog_get | Get one entry by ID, expanded with its payload, activation log, and events. |
data_catalog_register_cds | Register a newly created CDS view as a Data Catalog entry. |
cds_datasource_search | Value-help search for a CDS view's primary or associated datasource. |
cds_view_get | Get a Custom CDS View by (EntityName, DraftUUID, IsActiveEntity), including its field list. |
cds_view_create_and_register | End-to-end: validate the datasource, create + activate + publish the CDS view draft, then register it in the Data Catalog. Rolls back the draft on failure. |
events_list | List events, with OData $filter/$expand. |
events_get | Get one event by its composite key (ID, EventType, ObjectName, EventName). |
events_create | Create an event; resolves its parent Data Catalog object automatically from a payload match rather than requiring the ID. |
events_update | Update an event — implemented as delete-then-recreate, since events have no PATCH-able key. |
events_delete | Delete an event by its composite key. |
interfaces_list | List interfaces, with $filter/$expand. |
interfaces_get | Get one interface by (ConnectionId, InterfaceId). |
interfaces_create | Create an interface — message-type creation, activation, and header-field population in a single call. |
interface_deploy | Deploy an event onto a connection/interface (creates the DataLogNewSet row). Independent of publishing. |
interface_undeploy | Deactivate a deployed DataLogNewSet entry. |
interface_publish_to_ev_portal | Publish a deployed interface to the external Event Portal — Solace/AEM connections only. |
interface_deploy_and_publish | Composite: deploy, then publish to Event Portal, in one call. |
interface_create_deploy_publish | Composite: create, deploy, and publish end-to-end. No auto-rollback on partial failure — returns a structured status showing exactly which step failed. |
connections_list | List connections, with $filter/$expand. |
connections_get | Get one connection by key. |
header_fields_get | List header field values for a connection/interface. |
header_attributes_get | List header attribute definitions for a given adapter. |
transports_list | List transports, with $filter/$expand. |
transport_assign | Assign an interface configuration to a transport request/task. |
monitoring_get | Get monitoring data for a UTC time range. |
traces_get | Get traces for a trace document — the document name is built from a monitoring_get row, not supplied standalone. |
async_api_get | Get the AsyncAPI spec for a connection/interface. |
Role collections
The following role collections must be assigned to the user in relevant BTP subaccount.
| Role Collection | Purpose |
|---|---|
eventstudiocap_mcp_reader | Read-only MCP access for Event Studio |
eventstudiocap_mcp_writer | Read + write MCP access for Event Studio |
Example: Connect from Claude Desktop
How to connect it in Claude Desktop:
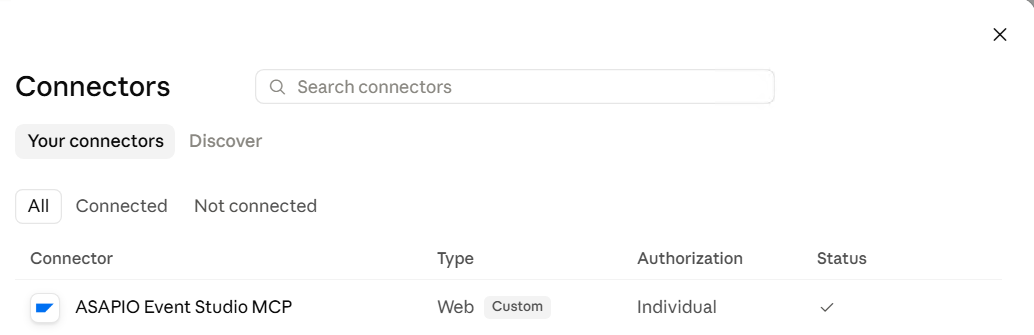
- Open Claude Desktop and go to Customize > Connectors (or Settings > Connectors, depending on your version).
- Find "ASAPIO Event Studio MCP", press the Connect button and follow the prompts to authenticate/connect (use your IAS tenant).
- If the MCP is not in the list, click the "+" button, then "Add custom connector."
- Enter a name (e.g. "ASAPIO Event Studio MCP") and the server URL for your instance – this is your own Event Studio deployment URL from your BTP tenant, not a URL provided by ASAPIO.
- Click "Add," then follow the prompts to authenticate/connect.
- Once connected, you can enable it per-conversation from the same Connectors menu, and Claude will be able to call its tools directly in chat.
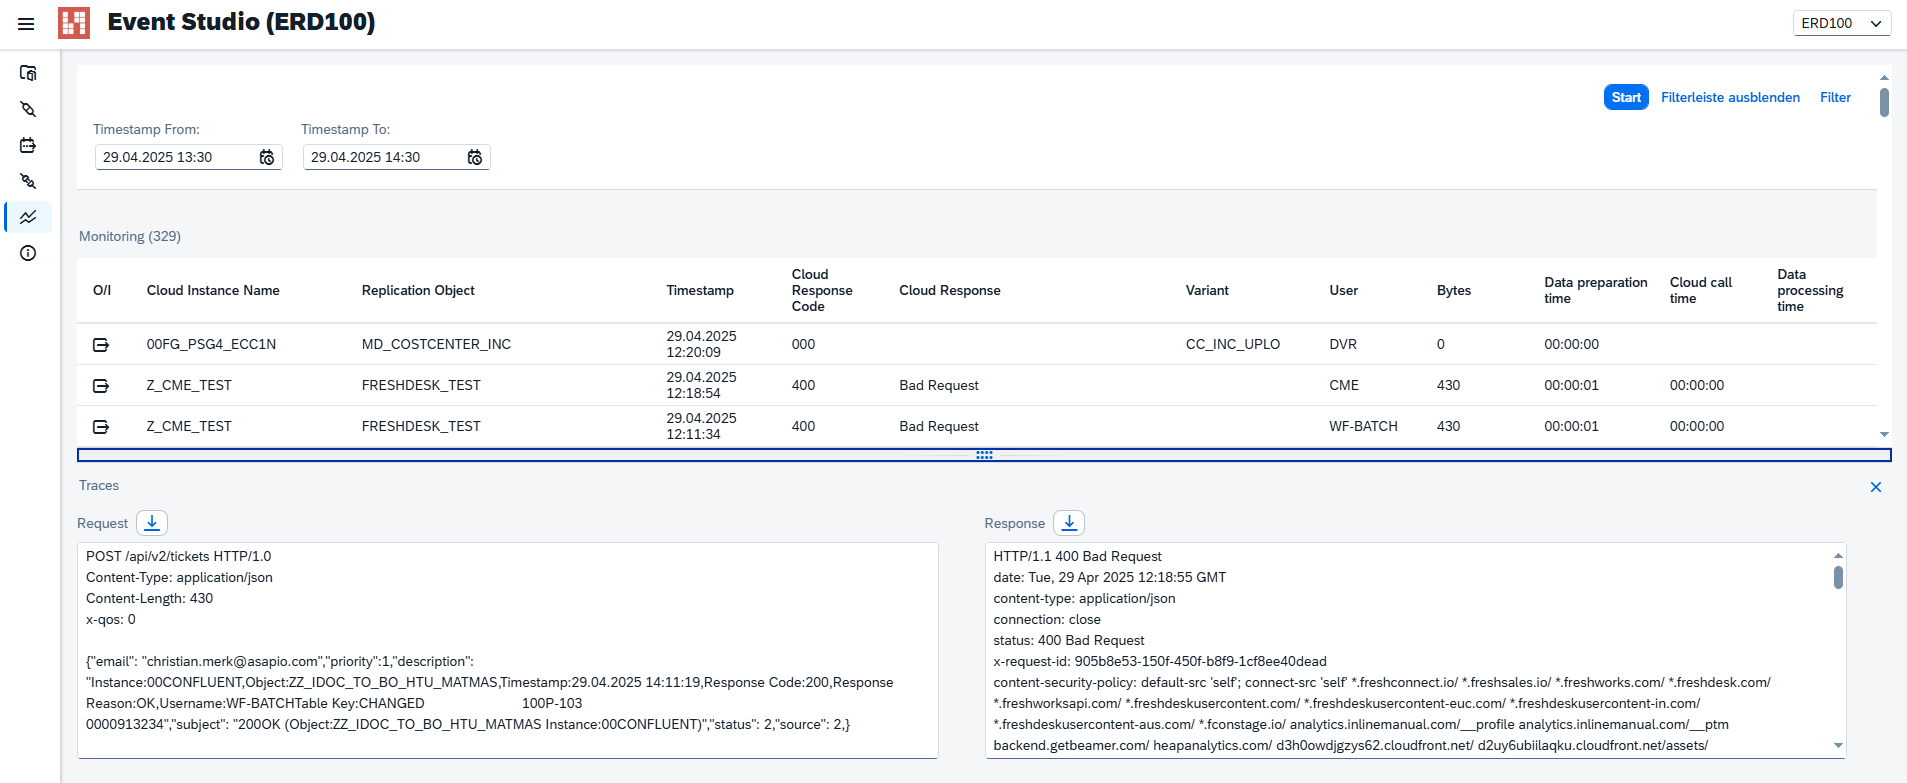
Monitoring
The Monitoring page tracks system activity for a specified time range. Use the From and To timestamp fields and click Go to refresh results. Select any entry in the results table to show the corresponding request and response traces at the bottom of the page. Traces can be downloaded for further analysis.
Help
The Help page displays the current Event Studio release version along with links to documentation and user guidelines.

Troubleshooting
If the application is running but data is missing on one or more pages, follow these steps:
Backend System
- Check packages: In SE80, verify that
/ASADEV/API_CONFIGand/ASADEV/API_EXTare present. If missing, re-import the transports. - Confirm table data: In SE11, verify that tables
/ASADEV/CTLG,/ASADEV/CTLG_LOG, and/ASADEV/CTLG_EVEexist and contain entries. - ABAP dumps: Check ST22 for dumps related to
/ASADEV/GW_CONFIG_API_SRVor/ASADEV/*classes. - Authorization failures: Use SU53 to identify missing roles or permissions for the current user.
- OData service activation: In /IWFND/MAINT_SERVICE, confirm
/ASADEV/GW_CONFIG_API_SRVis listed, activated, and has a system alias. Test the metadata endpoint in /IWFND/GW_CLIENT:/sap/opu/odata/asadev/GW_CONFIG_API_SRV/$metadatashould return HTTP 200. - OData error log: Check /IWFND/ERROR_LOG for service call errors.
If connected to multiple SAP systems, perform these checks for each system — a problem in one system can affect data visibility across the application.
Browser
- Open browser developer tools (F12), go to the Console tab, and look for errors with status codes 400, 403, or 500. Errors for
Component.jsor marked[FUTURE FATAL]can be ignored. - Clear the browser cache or use Incognito/Private Mode after updating the application.
Cloud Foundry / BTP Specific
- MultiApps plugin missing: Symptom:
'deploy' is not a registered command. Install withcf install-plugin -f multiapps. - Wrong org/space: Run
cf targetto verify, thencf target -o <org> -s <space>to correct. - Backend data not loading: Verify the destination exists, has
Proxy Type = OnPremise,Authentication = PrincipalPropagation, andasapio.eventStudioDest = true. Confirm Cloud Connector is connected to the same subaccount and the backend OData service is reachable. - AI panel not available: Check that the user has the
eventstudiocap_aiviewerrole collection and that the AI destination hasasapio.aiDest = true, a validasapio.modelName, and the correctURL.headers.Authorizationvalue. - Principal propagation issues: Temporarily switch the destination authentication to Basic Authentication to confirm principal propagation is the root cause. Review authentication logs in SAP BTP and Cloud Identity Authentication (IDP) for failed SSO or JWT token exchanges.
If the issue persists, contact the ASAPIO support team with: a description of the issue, screenshots of error messages from the browser console or SAP GUI, steps already taken, and details about the system configuration or recent changes.